问题描述 通常授权服务是作为独立的服务进行部署的或者使用的是由其他服务商提供的服务。Spring Authorization Server 比较特殊,它既可以作为独立服务进行部署,就如在上一篇文章 介绍的那样;又因为它是 Spring 体系下的一员,因此将它作为内部服务部署在 Gateway 后面又是完全可行的。但是在实践的过程中遇到了一点儿问题,下面是具体的问题描述。
在前一篇文章 文章的基础上对 example-auth 服务做一点儿改造使它成为内部服务。首先是要在 pom.xml 文件中加入 Eureka 客户端的依赖
1 2 3 4 <dependency > <groupId > org.springframework.cloud</groupId > <artifactId > spring-cloud-starter-netflix-eureka-client</artifactId > </dependency >
其次是在配置文件 application.xml 文件中加入 Eureka 服务端地址的配置
1
2
3
4
eureka: client: serviceUrl: defaultZone: http://localhost:8761/eureka/
当然不能忘了在 example-gateway 的 OAuth2ResourceServerConfig.java 中放行授权服务相关的请求
1
2
3
4
5
6
7
public SecurityWebFilterChain resourceServerSecurityFilterChain (ServerHttpSecurity http) { http.authorizeExchange(exchanges -> exchanges .pathMatchers("/example-auth/**" ).permitAll() return http.build(); }
现在我们已经将授权服务改造为了内部服务,我们来尝试测试一下看看是否符合我们的预期。
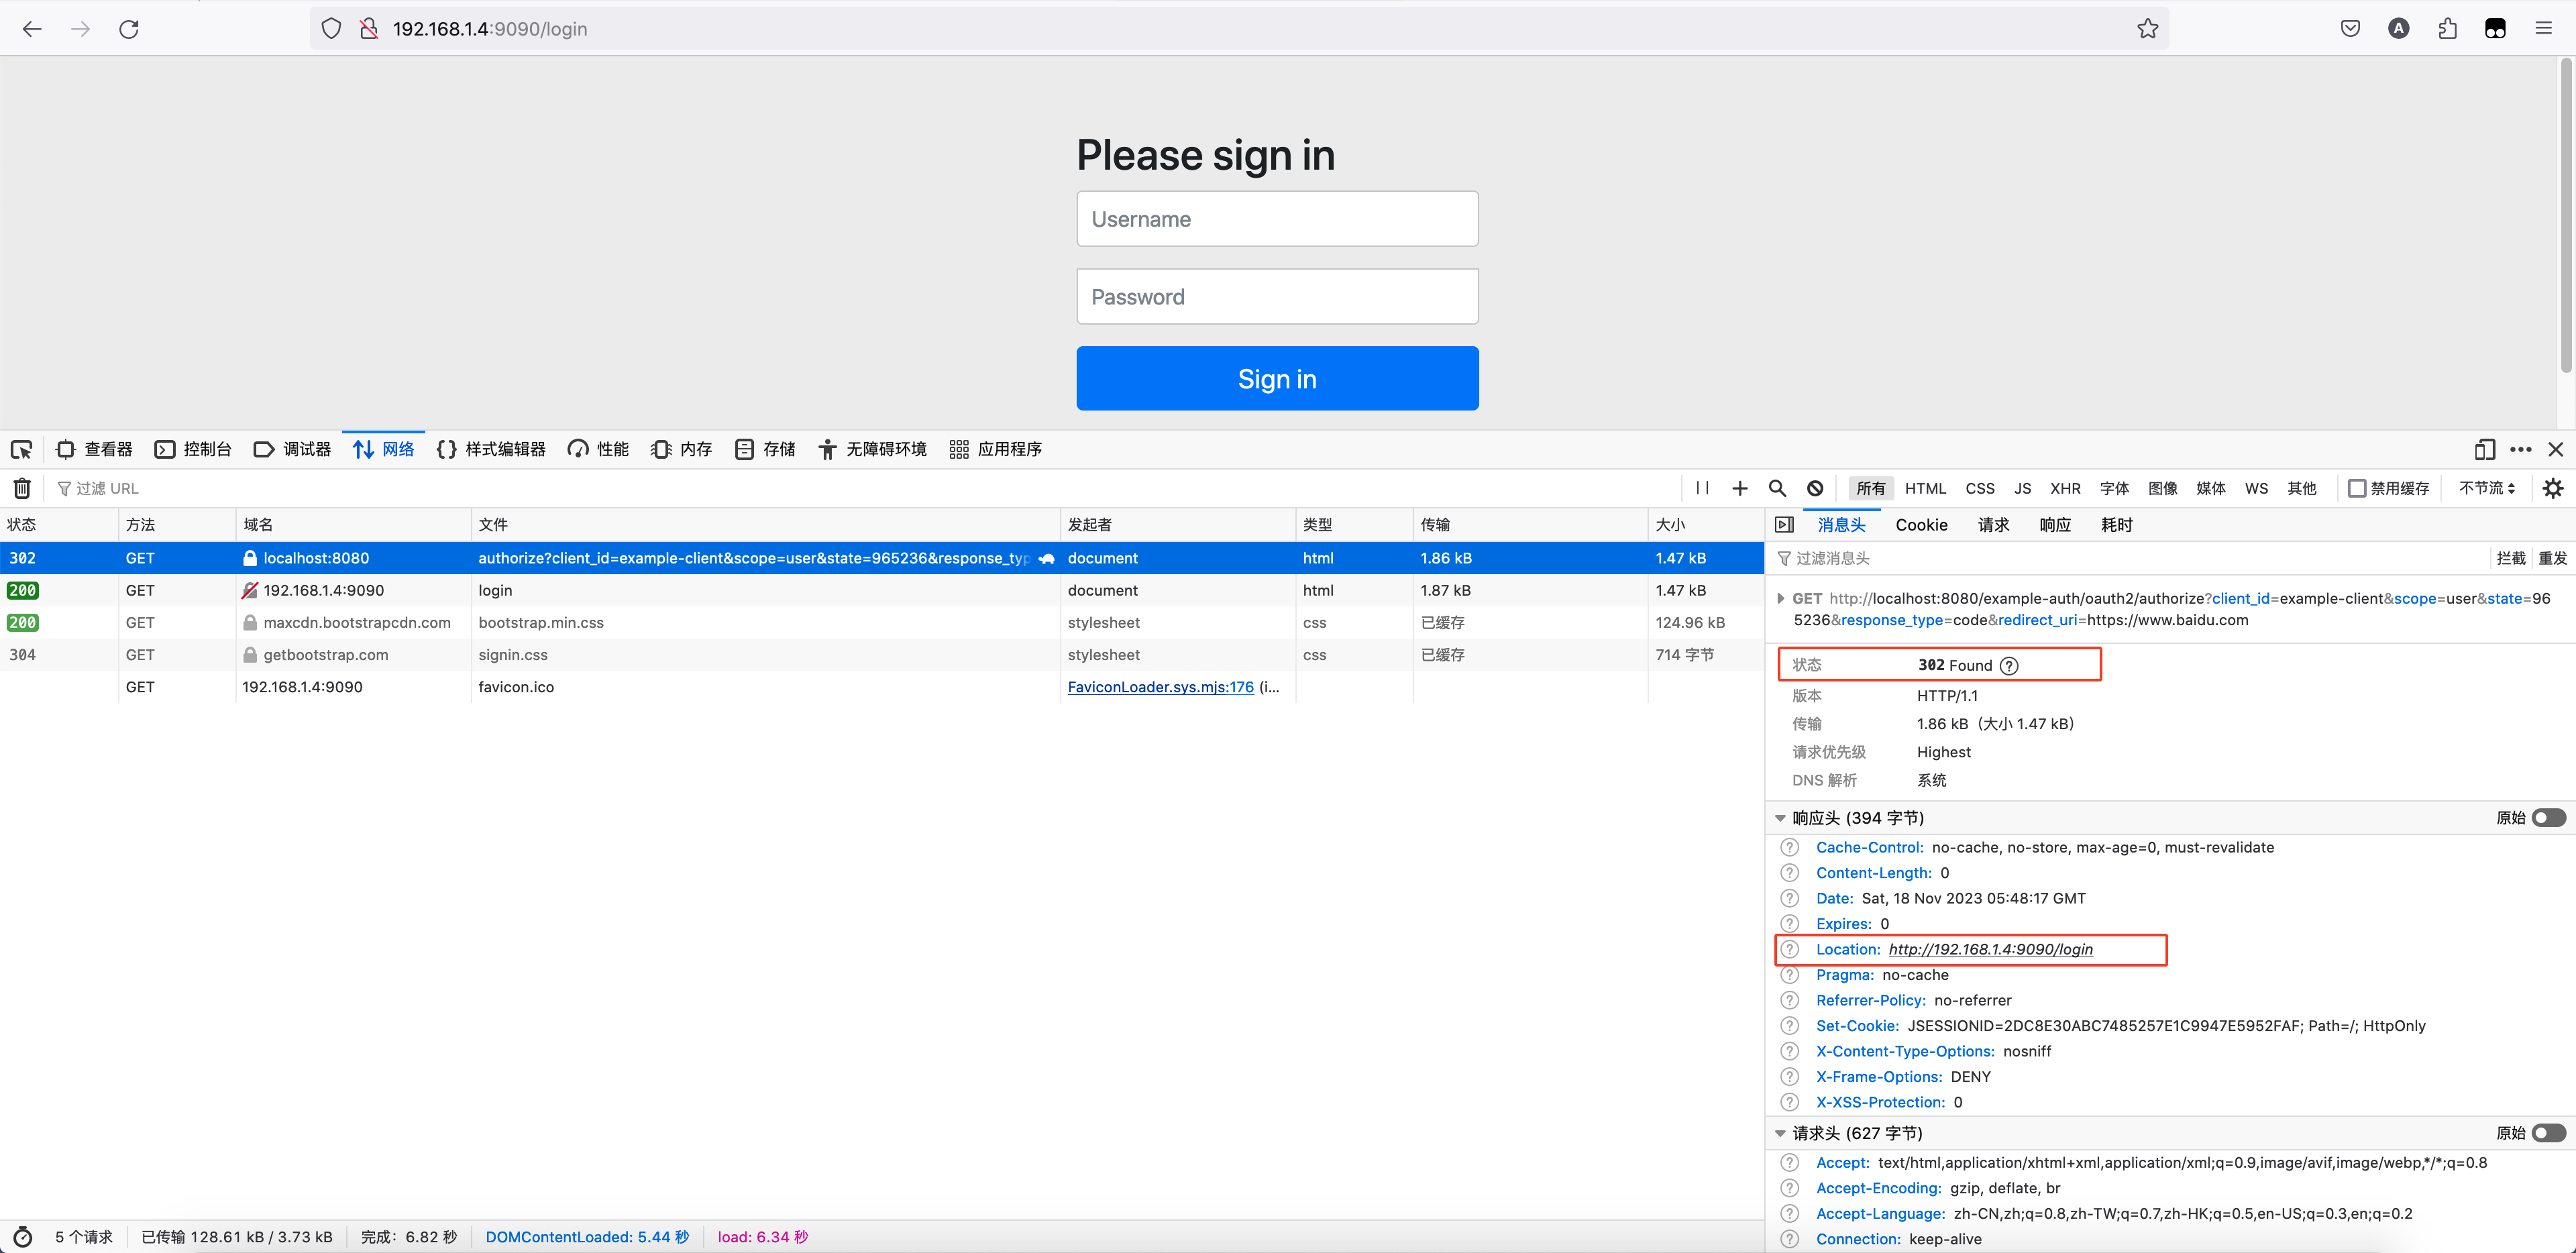
当我们在浏览器访问 http://localhost:8080/example-auth/oauth2/authorize?client_id=example-client&scope=user&state=965236&response_type=code&redirect_uri=https://www.baidu.com 获取授权码时会重定向到 example-auth 的登录页面
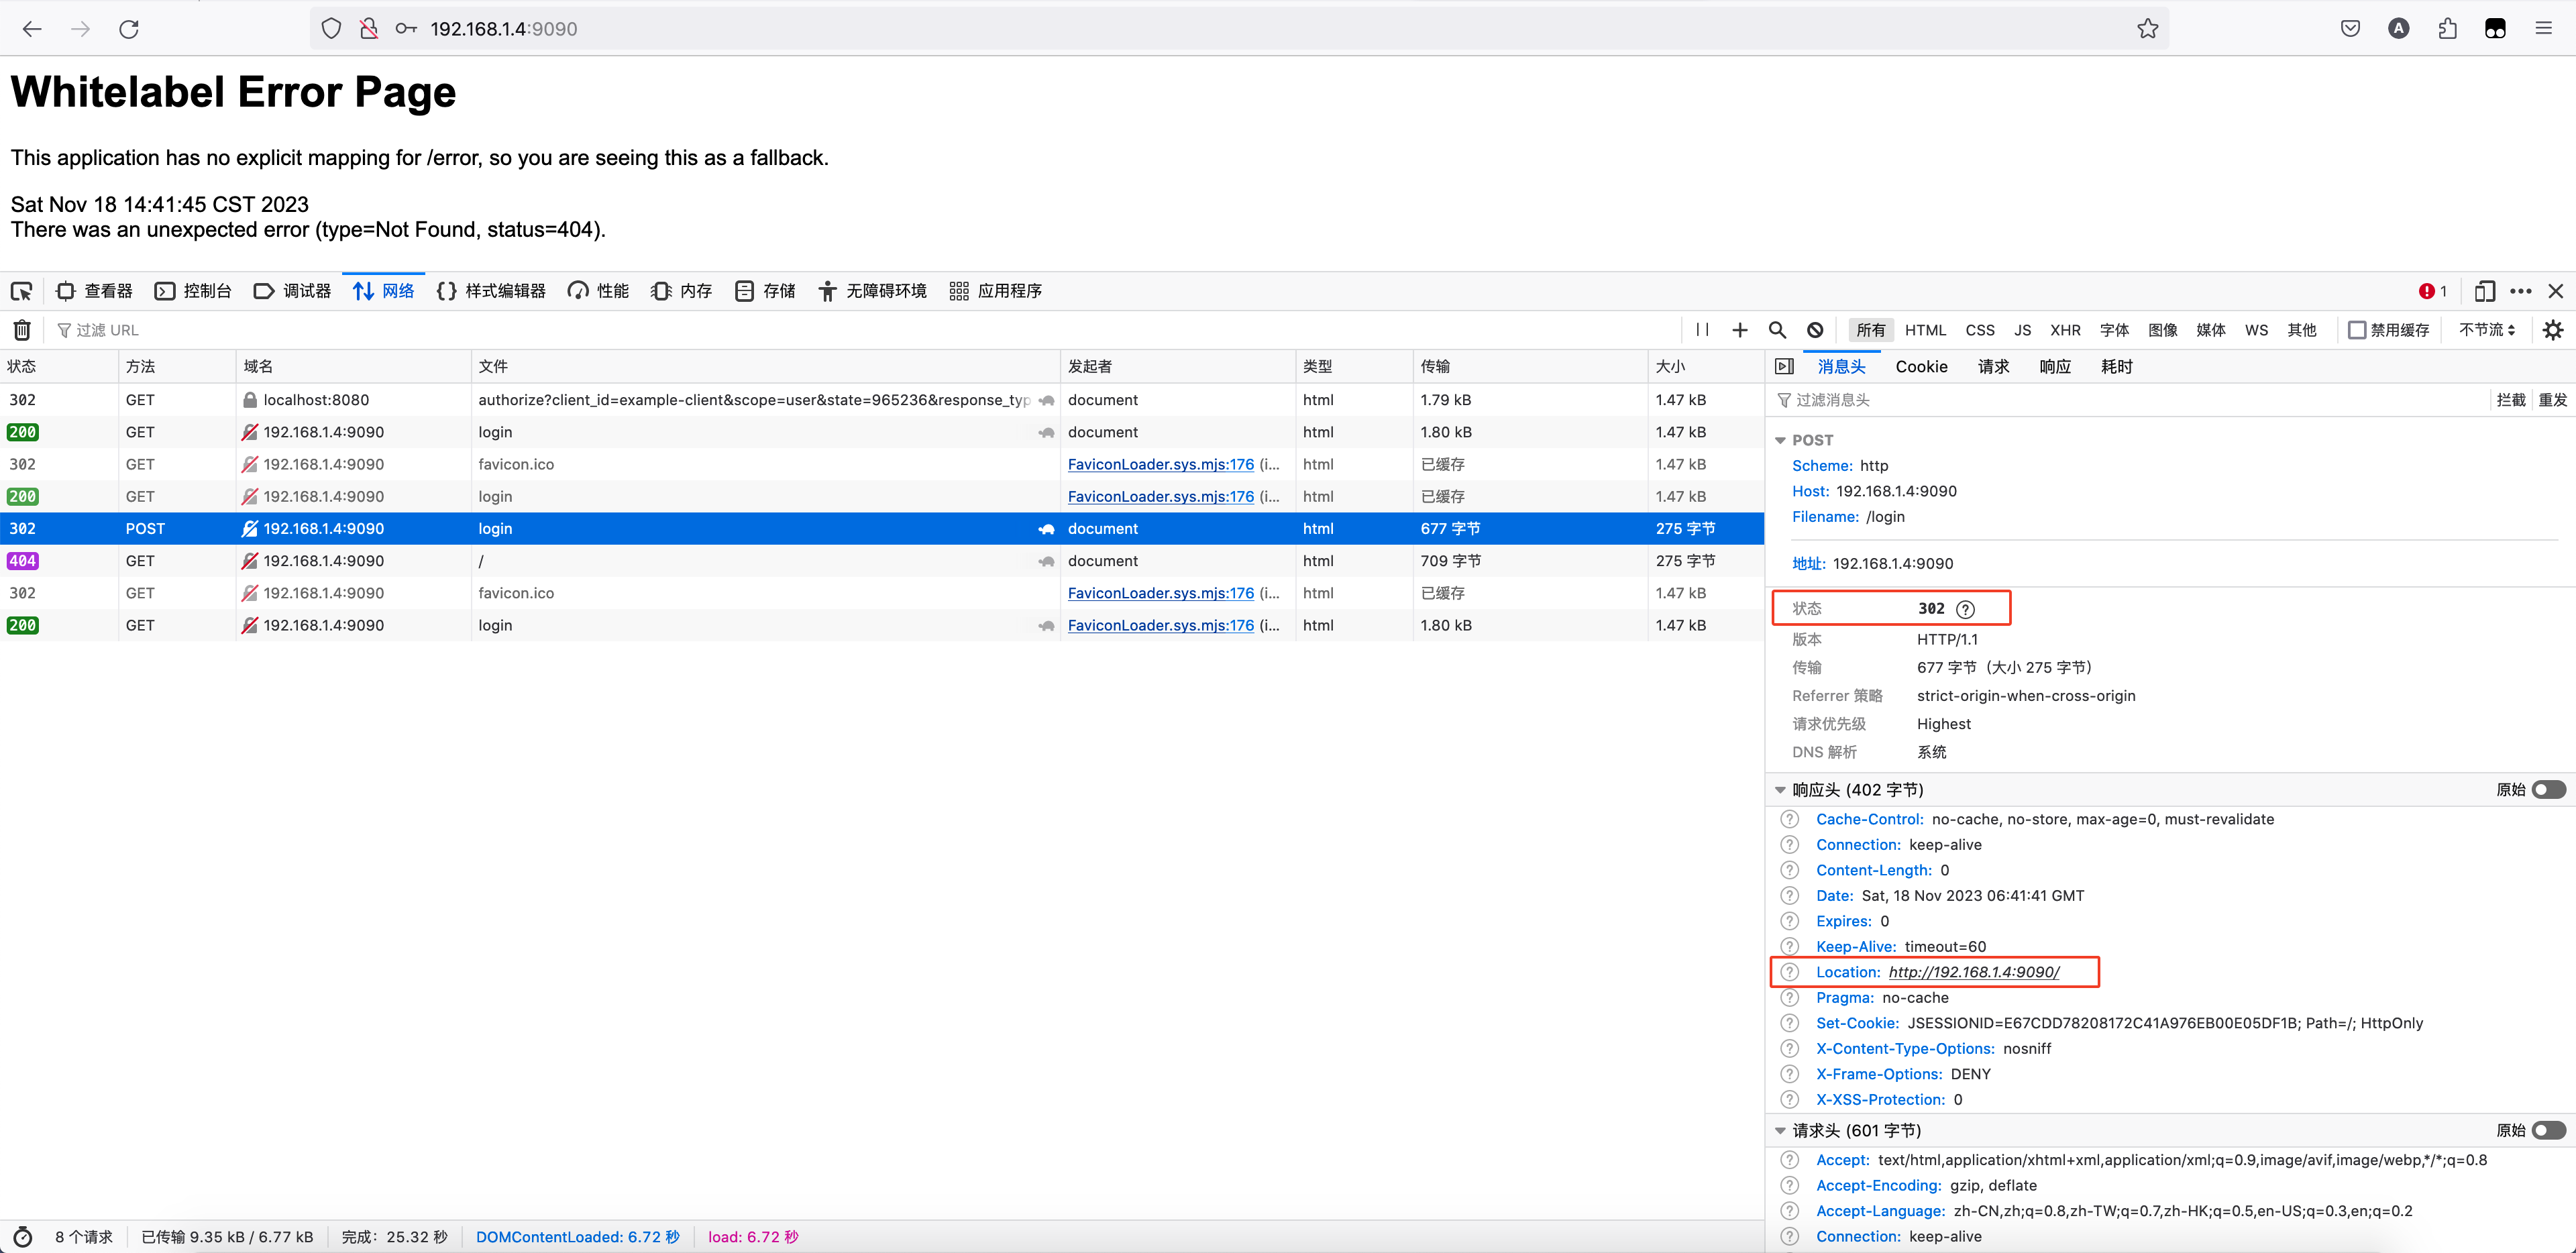
当我们输入用户名和密码登录后会重定向到 example-auth 的错误页面
其中浏览器地址栏中 IP 地址 192.168.1.4 是我本地电脑的 IP 地址。我们发现授权服务并没有如我们预期的那样重定向到授权页面,同时浏览器地址栏中的地址并不是网关的地址。那么问题是什么呢?请看下面的问题分析。
分析问题 重定向到登录页面的过程 当在浏览器访问地址 http://localhost:8080/example-auth/oauth2/authorize?client_id=example-client&scope=user&state=965236&response_type=code&redirect_uri=https://www.baidu.com 时,请求被网关转发到授权服务器 example-auth,经过一系列过滤器 Filter 后到达 OAuth2AuthorizationEndpointFilter,由它处理 /oauth2/authorize 请求,我们来看下的 doFilterInternal 方法的处理逻辑
1 2 3 4 5 6 7 8 9 10 11 12 13 14 15 16 17 18 19 20 21 22 23 24 25 26 27 28 29 protected void doFilterInternal (HttpServletRequest request, HttpServletResponse response, FilterChain filterChain) throws ServletException, IOException { if (!this .authorizationEndpointMatcher.matches(request)) { filterChain.doFilter(request, response); return ; } try { Authentication authentication = this .authenticationConverter.convert(request); if (authentication instanceof AbstractAuthenticationToken) { ((AbstractAuthenticationToken) authentication).setDetails(this .authenticationDetailsSource.buildDetails(request)); } Authentication authenticationResult = this .authenticationManager.authenticate(authentication); if (!authenticationResult.isAuthenticated()) { filterChain.doFilter(request, response); return ; } } catch (OAuth2AuthenticationException ex) { } }
由于是第一次请求肯定是未认证的,因此会继续交给后续过滤器进行处理,我们跳过中间的过滤器来到 ExceptionTranslationFilter,但是我们先不看这个过滤器的处理逻辑,我们先来看看它的后面一个处理,即 AuthorizationFilter 的处理逻辑
1 2 3 4 5 6 7 8 9 10 11 12 13 14 15 16 17 18 public void doFilter (ServletRequest servletRequest, ServletResponse servletResponse, FilterChain chain) throws ServletException, IOException { try { AuthorizationDecision decision = this .authorizationManager.check(this ::getAuthentication, request); this .eventPublisher.publishAuthorizationEvent(this ::getAuthentication, request, decision); if (decision != null && !decision.isGranted()) { throw new AccessDeniedException ("Access Denied" ); } chain.doFilter(request, response); } finally { request.removeAttribute(alreadyFilteredAttributeName); } }
因为未登录所以授权失败抛出了 AccessDeniedException,此时会回到上一个过滤器,即 ExceptionTranslationFilter 进行处理
1 2 3 4 5 6 7 8 9 10 11 12 13 14 private void doFilter (HttpServletRequest request, HttpServletResponse response, FilterChain chain) throws IOException, ServletException { try { chain.doFilter(request, response); } catch (IOException ex) { throw ex; } catch (Exception ex) { handleSpringSecurityException(request, response, chain, securityException); } }
handleSpringSecurityException 会一直调用到 handleAccessDeniedException 方法
1 2 3 4 5 6 7 8 9 10 11 12 13 14 15 private void handleAccessDeniedException (HttpServletRequest request, HttpServletResponse response, FilterChain chain, AccessDeniedException exception) throws ServletException, IOException { Authentication authentication = this .securityContextHolderStrategy.getContext().getAuthentication(); boolean isAnonymous = this .authenticationTrustResolver.isAnonymous(authentication); if (isAnonymous || this .authenticationTrustResolver.isRememberMe(authentication)) { sendStartAuthentication(request, response, chain, new InsufficientAuthenticationException (this .messages.getMessage("ExceptionTranslationFilter.insufficientAuthentication" , "Full authentication is required to access this resource" ))); } else { this .accessDeniedHandler.handle(request, response, exception); } }
sendStartAuthentication 方法会调用 DelegatingAuthenticationEntryPoint 类的 commence 方法,而后者又回调用 LoginUrlAuthenticationEntryPoint 类的 commence 方法
1 2 3 4 5 6 7 8 9 10 11 public void commence (HttpServletRequest request, HttpServletResponse response, AuthenticationException authException) throws IOException, ServletException { if (!this .useForward) { String redirectUrl = buildRedirectUrlToLoginPage(request, response, authException); this .redirectStrategy.sendRedirect(request, response, redirectUrl); return ; } }
DefaultRedirectStrategy 类的 sendRedirect 方法经过层层的调用会一直到 org.apache.catalina.connector.Response 类的 sendRedirect 方法
1 2 3 4 5 public void sendRedirect (String location) throws IOException { sendRedirect(location, SC_FOUND); }
这个方法会继续调用同一个类里的一个重载方法
1
2
3
4
5
6
7
8
9
10
11
12
13
14
15
16
17
18
19
20
21
22
23
24
25
public void sendRedirect (String location, int status) throws IOException { try { Context context = getContext(); String locationUri; if (getRequest().getCoyoteRequest().getSupportsRelativeRedirects() && (context == null || context.getUseRelativeRedirects())) { locationUri = location; } else { locationUri = toAbsolute(location); } setStatus(status); setHeader("Location" , locationUri); } catch (IllegalArgumentException e) { } }
我们看到在这个方法里向相应头写入了 Location,locationUri 的值为 http://192.168.1.4:9090/login。我们也可以通过浏览器收到的响应证实这一点
浏览器收到 302 响应后会自动重定向到 Location 指向的网页,从而显示登录页面。
重定向到白板页面的过程 我们输入用户名密码并点击登录按钮时,此时浏览器会以表单的形式向地址 http://192.168.1.4:9090/login 提交请求,这个请求经过一系列过滤器后会达到 UsernamePasswordAuthenticationFilter,从而在它的父类 AbstractAuthenticationProcessingFilter 进行处理
1 2 3 4 5 6 7 8 9 10 11 12 13 14 private void doFilter (HttpServletRequest request, HttpServletResponse response, FilterChain chain) throws IOException, ServletException { try { successfulAuthentication(request, response, chain, authenticationResult); } catch (InternalAuthenticationServiceException failed) { } catch (AuthenticationException ex) { } }
省略了具体的认证过程和认证失败后的处理过程,它们不是这里的重点,我们重点看认证成功后的处理过程
1 2 3 4 5 protected void successfulAuthentication (HttpServletRequest request, HttpServletResponse response, FilterChain chain, Authentication authResult) throws IOException, ServletException { this .successHandler.onAuthenticationSuccess(request, response, authResult); }
最后一行的 onAuthenticationSuccess 方法会调用 DefaultRedirectStrategy 类的 sendRedirect 方法
1
2
3
4
public void sendRedirect (HttpServletRequest request, HttpServletResponse response, String url) throws IOException { response.sendRedirect(redirectUrl); }
省略了构建 redirectUrl 的过程,而它的值为 /。根据前面的经验最后一行的 sendRedirect 方法会向相应头中写入 Location 变量,它的值为 http://192.168.1.4:9090/。我们也可以通过浏览器的收到的响应证实这一点
浏览器收到 302 响应后会自动重定向到 Location 指向的网页,在授权服务 example-auth 中没有 http://192.168.1.4:9090/ 对应的页面,因此最终现实了默认的白板页。
解决问题 通过上面的分析我们发现无论是发起获取授权码请求还是发起登录请求最终都会重定向到授权服务对应的 IP 地址而不是网关的地址,从而直接的和授权服务进行交互而不是通过网关和授权服务进行交互。另一方面获取授权码和登录它们的请求和相应都是通过网关的,重定向到授权服务对应的 IP 地址的行为是浏览器在收到 302 响应后由浏览器作出的。那么我们是否可以在网关写出 302 响应前修改 Location 的值,让它指向网关的地址而不是授权服务的地址,从而实现浏览器在重定向时使用网关的地址呢?这样不就一切就通过网关了吗?答案是可以的。
自定义响应过滤器 我们可以实现网关的 GlobalFilter 接口,自定义一个响应过滤器就可以完成这个需求
1
2
3
4
5
6
7
8
9
10
11
12
13
14
15
16
17
18
19
20
21
22
23
24
25
26
27
28
29
30
31
32
33
34
import org.springframework.cloud.gateway.filter.GatewayFilterChain;import org.springframework.cloud.gateway.filter.GlobalFilter;import org.springframework.cloud.gateway.filter.NettyWriteResponseFilter;import org.springframework.core.Ordered;import org.springframework.stereotype.Component;import org.springframework.web.server.ServerWebExchange;import reactor.core.publisher.Mono;@Component public class CustomResponseFilter implements GlobalFilter , Ordered { private String authorizationServiceName = "example-auth" ; @Override public Mono<Void> filter (ServerWebExchange exchange, GatewayFilterChain chain) { String path = exchange.getRequest().getPath().value(); if (path.contains("/oauth2/authorize" ) || path.contains("/login" )) { CustomServerHttpResponseDecorator decorator = new CustomServerHttpResponseDecorator (exchange.getResponse(), exchange.getRequest(), authorizationServiceName); return chain.filter(exchange.mutate().response(decorator).build()); } return chain.filter(exchange); } @Override public int getOrder () { return NettyWriteResponseFilter.WRITE_RESPONSE_FILTER_ORDER - 1 ; } }
自定义的响应装饰器 CustomServerHttpResponseDecorator 的代码如下所示
1
2
3
4
5
6
7
8
9
10
11
12
13
14
15
16
17
18
19
20
21
22
23
24
25
26
27
28
29
30
31
32
33
34
35
36
37
38
39
40
41
42
43
44
45
46
47
48
49
50
51
52
53
54
55
56
57
58
59
60
61
62
import org.reactivestreams.Publisher;import org.springframework.core.io.buffer.DataBuffer;import org.springframework.http.HttpStatusCode;import org.springframework.http.server.reactive.ServerHttpRequest;import org.springframework.http.server.reactive.ServerHttpResponse;import org.springframework.http.server.reactive.ServerHttpResponseDecorator;import reactor.core.publisher.Mono;import java.net.URI;import java.net.URISyntaxException;public class CustomServerHttpResponseDecorator extends ServerHttpResponseDecorator { private final ServerHttpRequest request; private final String authorizationServiceName; public CustomServerHttpResponseDecorator (ServerHttpResponse delegate, ServerHttpRequest request, String authorizationServiceName) { super (delegate); this .request = request; this .authorizationServiceName = authorizationServiceName; } @Override public Mono<Void> writeWith (Publisher<? extends DataBuffer> body) { HttpStatusCode statusCode = super .getStatusCode(); if (statusCode != null && statusCode.is3xxRedirection()) { URI location = super .getHeaders().getLocation(); if (location != null ) { String query = location.getQuery(); if (query == null || !query.contains("code=" )) { URI newLocation = getNewLocation(location); super .getHeaders().setLocation(newLocation); } } } return super .writeWith(body); } private URI getNewLocation (URI location) { URI newLocation; try { String newScheme = request.getURI().getScheme(); String newHost = request.getURI().getHost(); int newPort = request.getURI().getPort(); String newPath = "/" + authorizationServiceName + location.getPath(); newLocation = new URI (newScheme, null , newHost, newPort, newPath, location.getQuery(), location.getFragment()); } catch (URISyntaxException x) { throw new IllegalArgumentException (x.getMessage(), x); } return newLocation; } }
放行对授权服务的请求 1 2 3 4 5 6 7 8 9 10 11 12 13 14 15 16 17 18 19 20 @Configuration(proxyBeanMethods = false) public class OAuth2ResourceServerConfig { @Bean @Order(1) public SecurityWebFilterChain resourceServerSecurityFilterChain (ServerHttpSecurity http) { http.authorizeExchange(exchanges -> exchanges .pathMatchers("/example-auth/**" ).permitAll() .pathMatchers("/oauth2/authorize" ).permitAll() .pathMatchers("/login" ).permitAll() .anyExchange().authenticated()); http.oauth2ResourceServer(configurer -> configurer.jwt(Customizer.withDefaults())); http.csrf(ServerHttpSecurity.CsrfSpec::disable); return http.build(); } }
放行所有请求路径以 /example-auth 开头的请求是显而易见的。而额外的 /oauth2/authorize 和 /login 两个路径也放行就不是那么的显然。
简单的解释就是默认的登录页面和授权页面的表单的 action 属性的值分别为 /login 和 /oauth2/authorize,而点击相应的提交按钮后它们会拼接在网关的地址后面得到 http://localhost:8080/login 和 http://localhost:8080/oauth2/authorize,不放行它们的话对应的请求在网关就会被拦截,从而返回 401 Unauthorized。
重新配置路由转发规则 修改网关的配置文件 application.yml,重写转发到授权服务的路由规则
1 2 3 4 5 6 7 8 9 10 11 12 spring: cloud: gateway: routes: - id: example-auth uri: lb://example-auth predicates: - Path=/example-auth/**,/oauth2/authorize,/login
规则中 /example-auth/** 是显然的。配置 /login 和 /oauth2/authorize 的理由是它们是登录表单和授权表单的请求地址,网关无法处理它们,只有授权服务才能处理它们,因此他们也应当转发到授权服务。
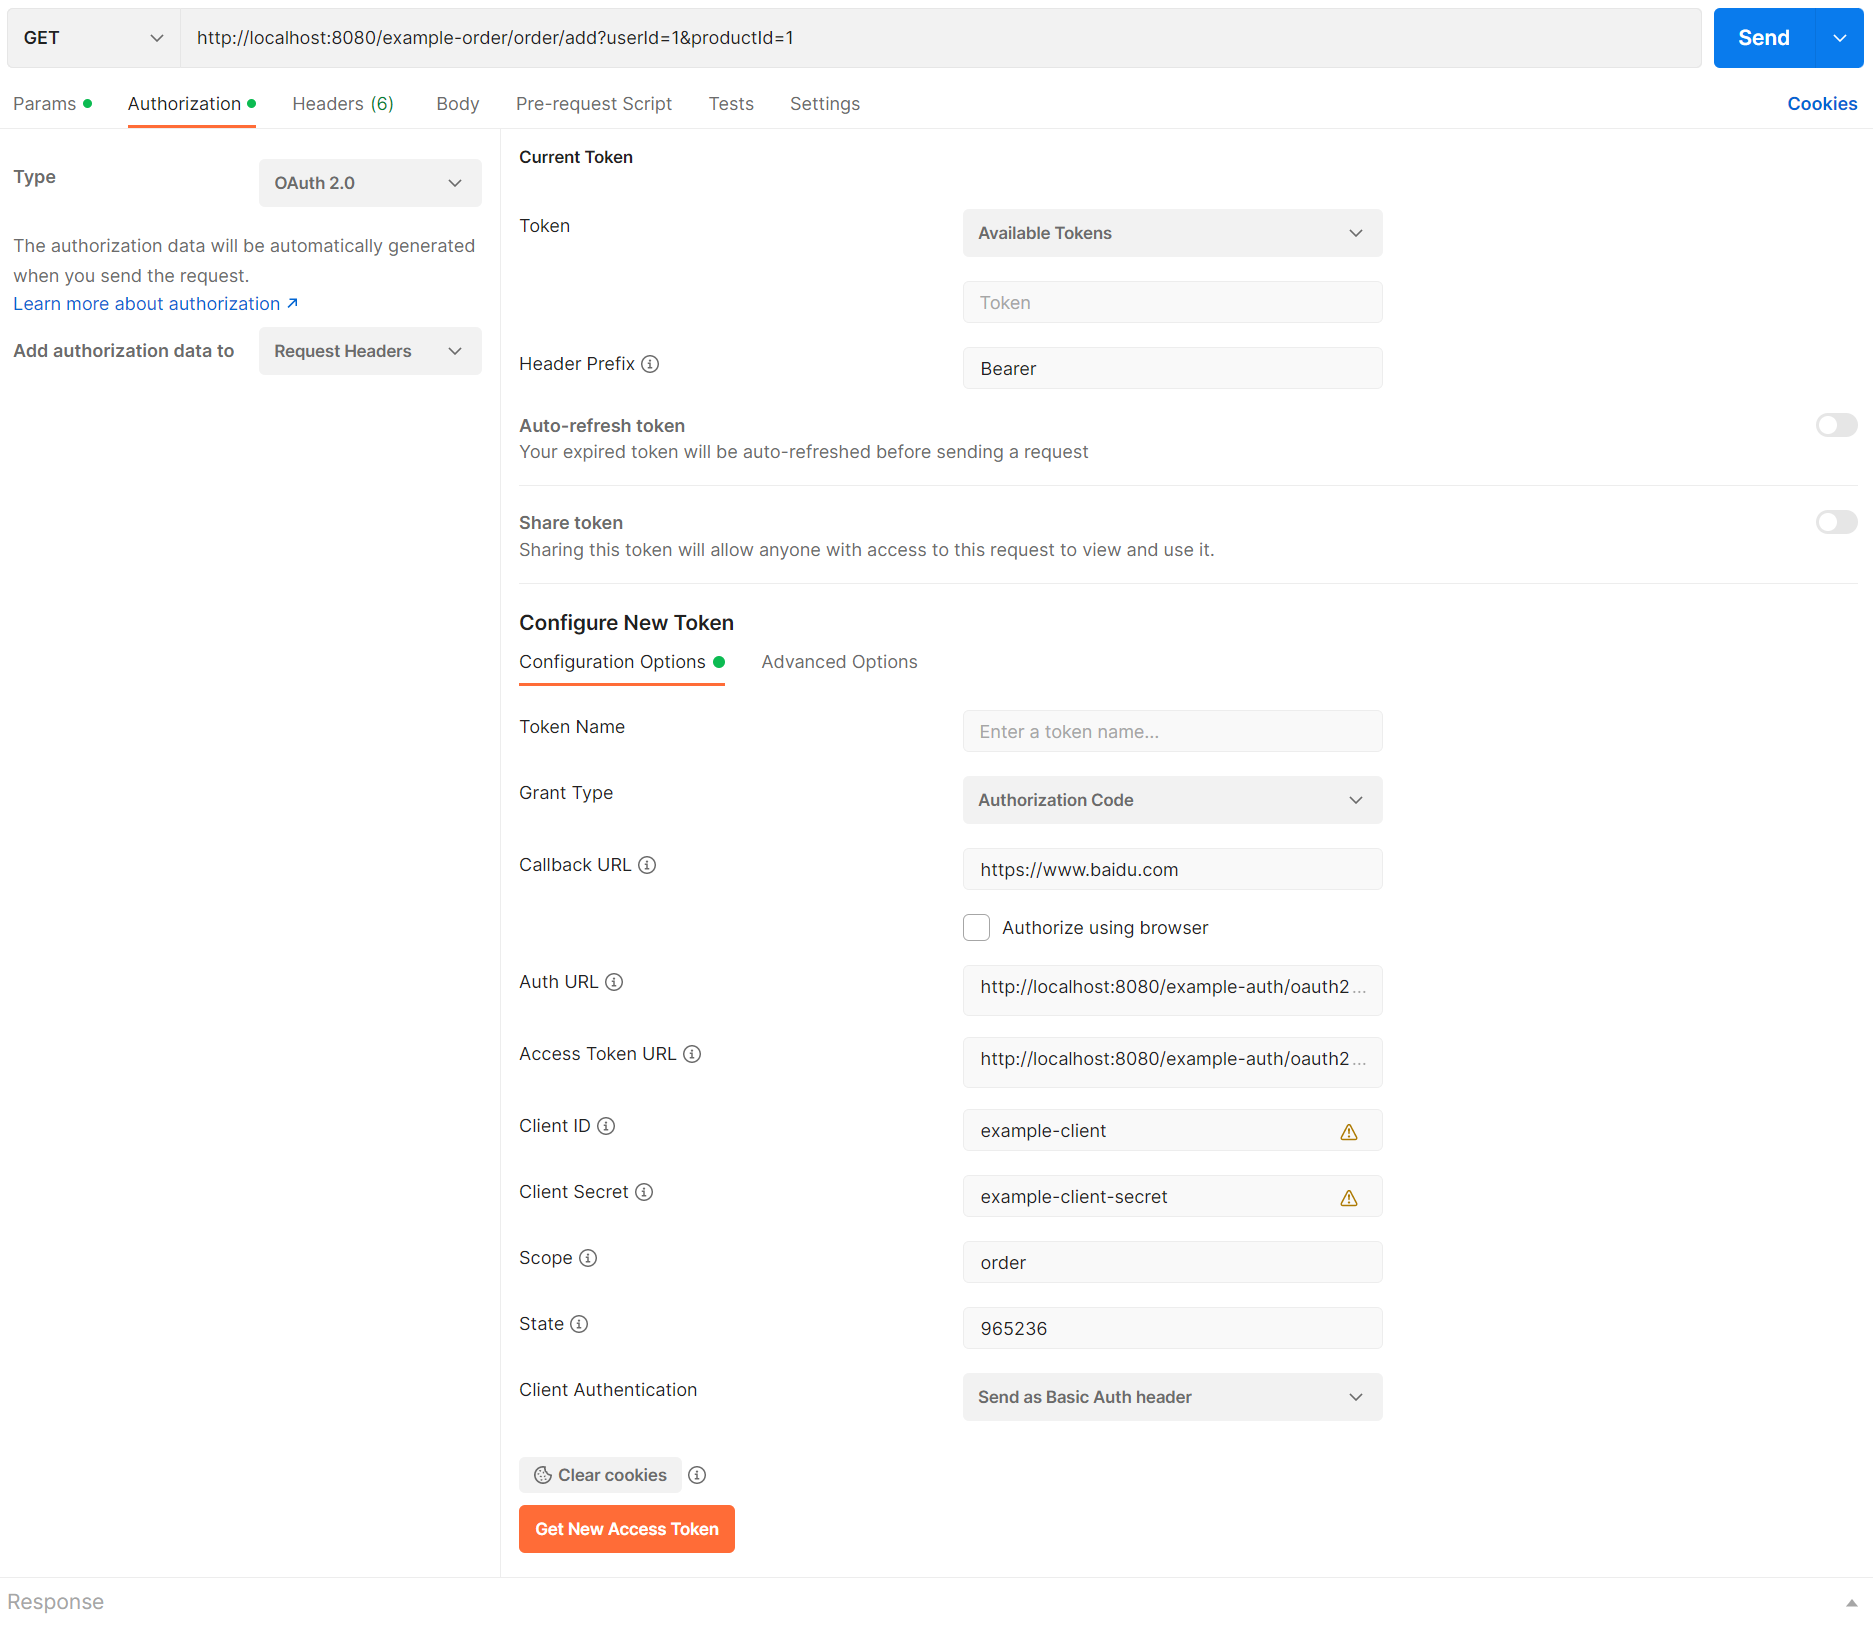
测试验证 Auth URL 和 Access Token URL 现在是通过网关进行请求的地址,它们的值分别为
Auth URL:http://localhost:8080/example-auth/oauth2/authorize
Access Token URL:http://localhost:8080/example-auth/oauth2/token
源码地址 examples/example-cloud
参考资料
oauth2 通过gateway请求授权码不能回调到return_uri oauth2授权码模式遇到的坑,1.走网关无法返回授权码 2.refresh_token新token丢失用户信息


