Spring Security OAuth 的生命周期已经结束,现在推荐使用 Spring Authorization Server 。
关于 OAuth2 的基本概念和授权流程不再赘述,可以参考 OAuth 2.1 和 The OAuth 2.1 Authorization Framework 进行学习。在我们构建的例子中虚拟用户 Bob 是 Resource Owner ,example-product 工程是 Resource Server ,Web Browser 和 Postman 充当了 Client ,而工程 example-auth 是 Authorization Server 。完整的项目目录结构如下所示
1
2
3
4
5
6
7
8
9
10
11
12
13
14
15
16
17
18
19
20
21
22
23
24
25
26
27
28
29
30
31
32
33
34
├── example-auth │ ├── pom.xml │ └── src │ └── main │ ├── java │ │ └── com │ │ └── example │ │ └── auth │ │ ├── ExampleAuthApplication.java # 启动类 │ │ └── config │ │ ├── OAuth2AuthorizationServerConfig.java # 授权服务器配置类 │ │ └── WebSecurityConfig.java # Web 安全配置类 │ └── resources │ └── application.yml # 配置文件 ├── example-product │ ├── pom.xml │ └── src │ └── main │ ├── java │ │ └── com │ │ └── example │ │ └── product │ │ ├── ExampleProductApplication.java # 启动类 │ │ ├── config │ │ │ ├── MethodSecurityConfig.java # 方法安全配置类 │ │ │ └── OAuth2ResourceServerConfig.java # 资源服务器配置类 │ │ ├── controller │ │ │ ├── CallbackController.java # 授权回调类 │ │ │ └── ProductController.java # 资源接口类 │ │ └── entity │ │ └── Product.java # 资源类 │ └── resources │ └── application.yml # 配置文件 └── pom.xml
父工程的 pom.xml 的内容如下所示
1
2
3
4
5
6
7
8
9
10
11
12
13
14
15
16
17
18
19
20
21
22
23
24
25
26
27
28
29
30
31
32
<?xml version="1.0" encoding="UTF-8" ?> <project xmlns ="http://maven.apache.org/POM/4.0.0" xmlns:xsi ="http://www.w3.org/2001/XMLSchema-instance" xsi:schemaLocation ="http://maven.apache.org/POM/4.0.0 https://maven.apache.org/xsd/maven-4.0.0.xsd" > <modelVersion > 4.0.0</modelVersion > <parent > <groupId > org.springframework.boot</groupId > <artifactId > spring-boot-starter-parent</artifactId > <version > 3.1.1</version > <relativePath /> </parent > <groupId > com.example</groupId > <artifactId > example-oauth2.1</artifactId > <version > 0.0.1-SNAPSHOT</version > <packaging > pom</packaging > <name > example-oauth2</name > <description > shop-oauth2</description > <modules > <module > example-auth</module > <module > example-product</module > </modules > <properties > <java.version > 17</java.version > <maven.compiler.source > 17</maven.compiler.source > <maven.compiler.target > 17</maven.compiler.target > <project.build.sourceEncoding > UTF-8</project.build.sourceEncoding > </properties > </project >
从这个文件内容我们可以发现,我们的项目使用了 Java 17 和 Spring Boot 3.1.1 两个主要的版本。下面就让我们来从零开始构建上面这样一个项目。
授权服务器 依赖配置 授权服务器的依赖配置 pom.xml 如下所示
1
2
3
4
5
6
7
8
9
10
11
12
13
14
15
16
17
18
19
20
21
22
23
24
25
26
27
28
29
30
31
32
33
34
35
36
37
38
<?xml version="1.0" encoding="UTF-8" ?> <project xmlns ="http://maven.apache.org/POM/4.0.0" xmlns:xsi ="http://www.w3.org/2001/XMLSchema-instance" xsi:schemaLocation ="http://maven.apache.org/POM/4.0.0 http://maven.apache.org/xsd/maven-4.0.0.xsd" > <modelVersion > 4.0.0</modelVersion > <parent > <groupId > com.example</groupId > <artifactId > example-oauth2.1</artifactId > <version > 0.0.1-SNAPSHOT</version > </parent > <artifactId > example-auth</artifactId > <dependencies > <dependency > <groupId > org.springframework.boot</groupId > <artifactId > spring-boot-starter-oauth2-authorization-server</artifactId > </dependency > </dependencies > <build > <plugins > <plugin > <groupId > org.springframework.boot</groupId > <artifactId > spring-boot-maven-plugin</artifactId > <configuration > <excludes > <exclude > <groupId > org.projectlombok</groupId > <artifactId > lombok</artifactId > </exclude > </excludes > </configuration > </plugin > </plugins > </build > </project >
授权服务器就一个依赖 spring-boot-starter-oauth2-authorization-server。
端口配置 我们给授权服务器分配的端口为 8081,配置在 application.yml 文件中
Web 安全配置 Web 安全配置类 WebSecurityConfig 的代码如下所示
1 2 3 4 5 6 7 8 9 10 11 12 13 14 15 16 17 18 19 20 21 22 23 24 25 26 27 28 29 30 31 32 33 import org.springframework.context.annotation.Bean;import org.springframework.context.annotation.Configuration;import org.springframework.core.annotation.Order;import org.springframework.security.config.Customizer;import org.springframework.security.config.annotation.web.builders.HttpSecurity;import org.springframework.security.core.userdetails.User;import org.springframework.security.core.userdetails.UserDetails;import org.springframework.security.core.userdetails.UserDetailsService;import org.springframework.security.provisioning.InMemoryUserDetailsManager;import org.springframework.security.web.SecurityFilterChain;@Configuration(proxyBeanMethods = false) public class WebSecurityConfig { @Bean @Order(2) public SecurityFilterChain defaultSecurityFilterChain (HttpSecurity http) throws Exception { http.authorizeHttpRequests((authorize) -> authorize.anyRequest().authenticated()) .formLogin(Customizer.withDefaults()); return http.build(); } @Bean public UserDetailsService userDetailsService () { UserDetails userDetails = User.withDefaultPasswordEncoder() .username("bob" ) .password("123456" ) .roles("USER" ) .build(); return new InMemoryUserDetailsManager (userDetails); } }
配置类的内容来自 Spring Authorization Server Reference - Getting Started - Defining Required Components ,只是把与 Web 安全相关的内容提取到了这个类。
授权服务器配置 1 2 3 4 5 6 7 8 9 10 11 12 13 14 15 16 17 18 19 20 21 22 23 24 25 26 27 28 29 30 31 32 33 34 35 36 37 38 39 40 41 42 43 44 45 46 47 48 49 50 51 52 53 54 55 56 57 58 59 60 61 62 63 64 65 66 67 68 69 70 71 72 73 74 75 76 77 78 79 80 81 82 83 84 85 86 87 88 89 90 91 92 93 94 95 96 97 98 99 100 101 102 103 104 105 106 107 import com.nimbusds.jose.jwk.JWKSet;import com.nimbusds.jose.jwk.RSAKey;import com.nimbusds.jose.jwk.source.ImmutableJWKSet;import com.nimbusds.jose.jwk.source.JWKSource;import com.nimbusds.jose.proc.SecurityContext;import org.springframework.context.annotation.Bean;import org.springframework.context.annotation.Configuration;import org.springframework.core.annotation.Order;import org.springframework.http.MediaType;import org.springframework.security.config.Customizer;import org.springframework.security.config.annotation.web.builders.HttpSecurity;import org.springframework.security.oauth2.core.AuthorizationGrantType;import org.springframework.security.oauth2.core.ClientAuthenticationMethod;import org.springframework.security.oauth2.jwt.JwtDecoder;import org.springframework.security.oauth2.server.authorization.client.InMemoryRegisteredClientRepository;import org.springframework.security.oauth2.server.authorization.client.RegisteredClient;import org.springframework.security.oauth2.server.authorization.client.RegisteredClientRepository;import org.springframework.security.oauth2.server.authorization.config.annotation.web.configuration.OAuth2AuthorizationServerConfiguration;import org.springframework.security.oauth2.server.authorization.config.annotation.web.configurers.OAuth2AuthorizationServerConfigurer;import org.springframework.security.oauth2.server.authorization.settings.AuthorizationServerSettings;import org.springframework.security.oauth2.server.authorization.settings.ClientSettings;import org.springframework.security.web.SecurityFilterChain;import org.springframework.security.web.authentication.LoginUrlAuthenticationEntryPoint;import org.springframework.security.web.util.matcher.MediaTypeRequestMatcher;import java.security.KeyPair;import java.security.KeyPairGenerator;import java.security.interfaces.RSAPrivateKey;import java.security.interfaces.RSAPublicKey;import java.util.UUID;@Configuration(proxyBeanMethods = false) public class OAuth2AuthorizationServerConfig { @Bean @Order(1) public SecurityFilterChain authorizationServerSecurityFilterChain (HttpSecurity http) throws Exception { OAuth2AuthorizationServerConfiguration.applyDefaultSecurity(http); http.getConfigurer(OAuth2AuthorizationServerConfigurer.class) .oidc(Customizer.withDefaults()); http .exceptionHandling((exceptions) -> exceptions.defaultAuthenticationEntryPointFor( new LoginUrlAuthenticationEntryPoint ("/login" ), new MediaTypeRequestMatcher (MediaType.TEXT_HTML)) ) .oauth2ResourceServer((resourceServer) -> resourceServer.jwt(Customizer.withDefaults())); return http.build(); } @Bean public RegisteredClientRepository registeredClientRepository () { RegisteredClient registeredClient = RegisteredClient.withId(UUID.randomUUID().toString()) .clientId("example-product" ) .clientSecret("{noop}example-product-secret" ) .clientAuthenticationMethod(ClientAuthenticationMethod.CLIENT_SECRET_BASIC) .authorizationGrantType(AuthorizationGrantType.AUTHORIZATION_CODE) .authorizationGrantType(AuthorizationGrantType.REFRESH_TOKEN) .redirectUri("http://127.0.0.1:8082/callback/authorized" ) .scope("product" ) .scope("user" ) .clientSettings(ClientSettings.builder().requireAuthorizationConsent(true ).build()) .build(); return new InMemoryRegisteredClientRepository (registeredClient); } @Bean public JWKSource<SecurityContext> jwkSource () { KeyPair keyPair = generateRsaKey(); RSAPublicKey publicKey = (RSAPublicKey) keyPair.getPublic(); RSAPrivateKey privateKey = (RSAPrivateKey) keyPair.getPrivate(); RSAKey rsaKey = new RSAKey .Builder(publicKey) .privateKey(privateKey) .keyID(UUID.randomUUID().toString()) .build(); JWKSet jwkSet = new JWKSet (rsaKey); return new ImmutableJWKSet <>(jwkSet); } private static KeyPair generateRsaKey () { KeyPair keyPair; try { KeyPairGenerator keyPairGenerator = KeyPairGenerator.getInstance("RSA" ); keyPairGenerator.initialize(2048 ); keyPair = keyPairGenerator.generateKeyPair(); } catch (Exception ex) { throw new IllegalStateException (ex); } return keyPair; } @Bean public JwtDecoder jwtDecoder (JWKSource<SecurityContext> jwkSource) { return OAuth2AuthorizationServerConfiguration.jwtDecoder(jwkSource); } @Bean public AuthorizationServerSettings authorizationServerSettings () { return AuthorizationServerSettings.builder() .issuer("http://127.0.0.1:8081" ) .build(); } }
配置类的内容来自 Spring Authorization Server Reference - Getting Started - Defining Required Components ,只是把与授权服务器相关的内容提取到了这个类。
到这里我们就构建了一个简单的授权服务器。
资源服务器 依赖配置 资源服务器依赖文件 pom.xml 的内容如下所示
1 2 3 4 5 6 7 8 9 10 11 12 13 14 15 16 17 18 19 20 21 22 23 24 25 26 27 28 29 30 31 32 33 34 35 36 37 38 39 40 41 42 43 44 45 46 <?xml version="1.0" encoding="UTF-8" ?> <project xmlns ="http://maven.apache.org/POM/4.0.0" xmlns:xsi ="http://www.w3.org/2001/XMLSchema-instance" xsi:schemaLocation ="http://maven.apache.org/POM/4.0.0 http://maven.apache.org/xsd/maven-4.0.0.xsd" > <modelVersion > 4.0.0</modelVersion > <parent > <groupId > com.example</groupId > <artifactId > example-oauth2.1</artifactId > <version > 0.0.1-SNAPSHOT</version > </parent > <artifactId > example-product</artifactId > <dependencies > <dependency > <groupId > org.springframework.boot</groupId > <artifactId > spring-boot-starter-web</artifactId > </dependency > <dependency > <groupId > org.springframework.boot</groupId > <artifactId > spring-boot-starter-oauth2-resource-server</artifactId > </dependency > <dependency > <groupId > org.projectlombok</groupId > <artifactId > lombok</artifactId > <optional > true</optional > </dependency > </dependencies > <build > <plugins > <plugin > <groupId > org.springframework.boot</groupId > <artifactId > spring-boot-maven-plugin</artifactId > <configuration > <excludes > <exclude > <groupId > org.projectlombok</groupId > <artifactId > lombok</artifactId > </exclude > </excludes > </configuration > </plugin > </plugins > </build > </project >
它最重要的一个依赖是 spring-boot-starter-oauth2-resource-server。
端口配置 我们给资源服务器分配的端口为 8082,配置在 application.yml 文件中
授权服务器元数据端点配置 端点的配置要与授权服务器中 authorizationServerSettings Bean 中配置的一致,配置在 application.yml 文件中
1 2 3 4 5 6 spring: security: oauth2: resourceserver: jwt: issuer-uri: http://127.0.0.1:8081
资源和资源接口 首先我们来创建资源和相应的访问接口。我们的资源很简单,它只有 id 和 name 两个属性
1 2 3 4 5 6 7 8 import lombok.Data;@Data public class Product { private Integer id; private String name; }
我们的资源接口也很简单,它只有一个访问详情的接口
1 2 3 4 5 6 7 8 9 10 11 12 13 14 15 16 17 18 19 import com.example.product.entity.Product;import org.springframework.security.access.prepost.PreAuthorize;import org.springframework.web.bind.annotation.GetMapping;import org.springframework.web.bind.annotation.PathVariable;import org.springframework.web.bind.annotation.RequestMapping;import org.springframework.web.bind.annotation.RestController;@RestController @RequestMapping("/product") public class ProductController { @GetMapping("/{id}") @PreAuthorize("hasAuthority('SCOPE_product')") public Product detail (@PathVariable("id") Integer id) { Product product = new Product (); product.setId(id); product.setName("product-" + id); return product; } }
注意到 @PreAuthorize("hasAuthority('SCOPE_product')") 这行代码,它需要开启方法的安全配置才会生效,参考后面的方法安全配置类。SCOPE_product 有两部分构成,第一部分是固定的 SCOPE,第二部分是在授权服务器的 registeredClientRepository Bean 中配置的授权范围 product,它们之间用下划线 _ 连接起来。
授权回调接口 1 2 3 4 5 6 7 8 9 10 11 12 13 import org.springframework.web.bind.annotation.GetMapping;import org.springframework.web.bind.annotation.RequestMapping;import org.springframework.web.bind.annotation.RestController;@RestController @RequestMapping("/callback") public class CallbackController { @GetMapping("/authorized") public void authorized (String code) { System.out.println("授权码:" + code); } }
我们只是简单的打印了授权码。在真实的场景中这个接口应该是客户端需要实现的,因为我们使用 Web Browser 和 Postman 作为我们的客户端,所以暂时将它实现在授权服务器中。
资源服务器配置 1 2 3 4 5 6 7 8 9 10 11 12 13 14 15 16 17 18 19 20 21 22 import org.springframework.context.annotation.Bean;import org.springframework.context.annotation.Configuration;import org.springframework.core.annotation.Order;import org.springframework.security.config.Customizer;import org.springframework.security.config.annotation.web.builders.HttpSecurity;import org.springframework.security.web.SecurityFilterChain;@Configuration(proxyBeanMethods = false) public class OAuth2ResourceServerConfig { @Bean @Order(1) public SecurityFilterChain resourceServerSecurityFilterChain (HttpSecurity http) throws Exception { http.authorizeHttpRequests(authorize -> authorize .requestMatchers("/callback/**" ).anonymous() .anyRequest().authenticated()); http.oauth2ResourceServer(configurer -> configurer.jwt(Customizer.withDefaults())); return http.build(); } }
方法安全配置 1 2 3 4 5 6 7 import org.springframework.context.annotation.Configuration;import org.springframework.security.config.annotation.method.configuration.EnableMethodSecurity;@Configuration(proxyBeanMethods = false) @EnableMethodSecurity public class MethodSecurityConfig {}
只需要添加 @EnableMethodSecurity 注解即可,其他不需要做什么了。
验证测试 这里只测试授权码模式,即 authorization_code 模式。
申请授权码 在浏览器中访问 http://localhost:8081/oauth2/authorize?client_id=example-product&scope=product&state=965236&response_type=code&redirect_uri=http://127.0.0.1:8082/callback/authorized 申请授权码
请求参数说明
请求参数
说明
是否必填
client_id
客户端 ID
yes
scope
用来限制客户端的访问范围(权限),如果为空的话,那么会返回客户端拥有全部的访问范围
no
state
可以取随机值, 用于防止 CSRF 攻击
no
response_type
响应模式,固定为 code(授权码)
yes
redirect_uri
回调地址,当授权码申请成功后浏览器会重定向到此地址,并在后边带上 code 参数(授权码)
yes
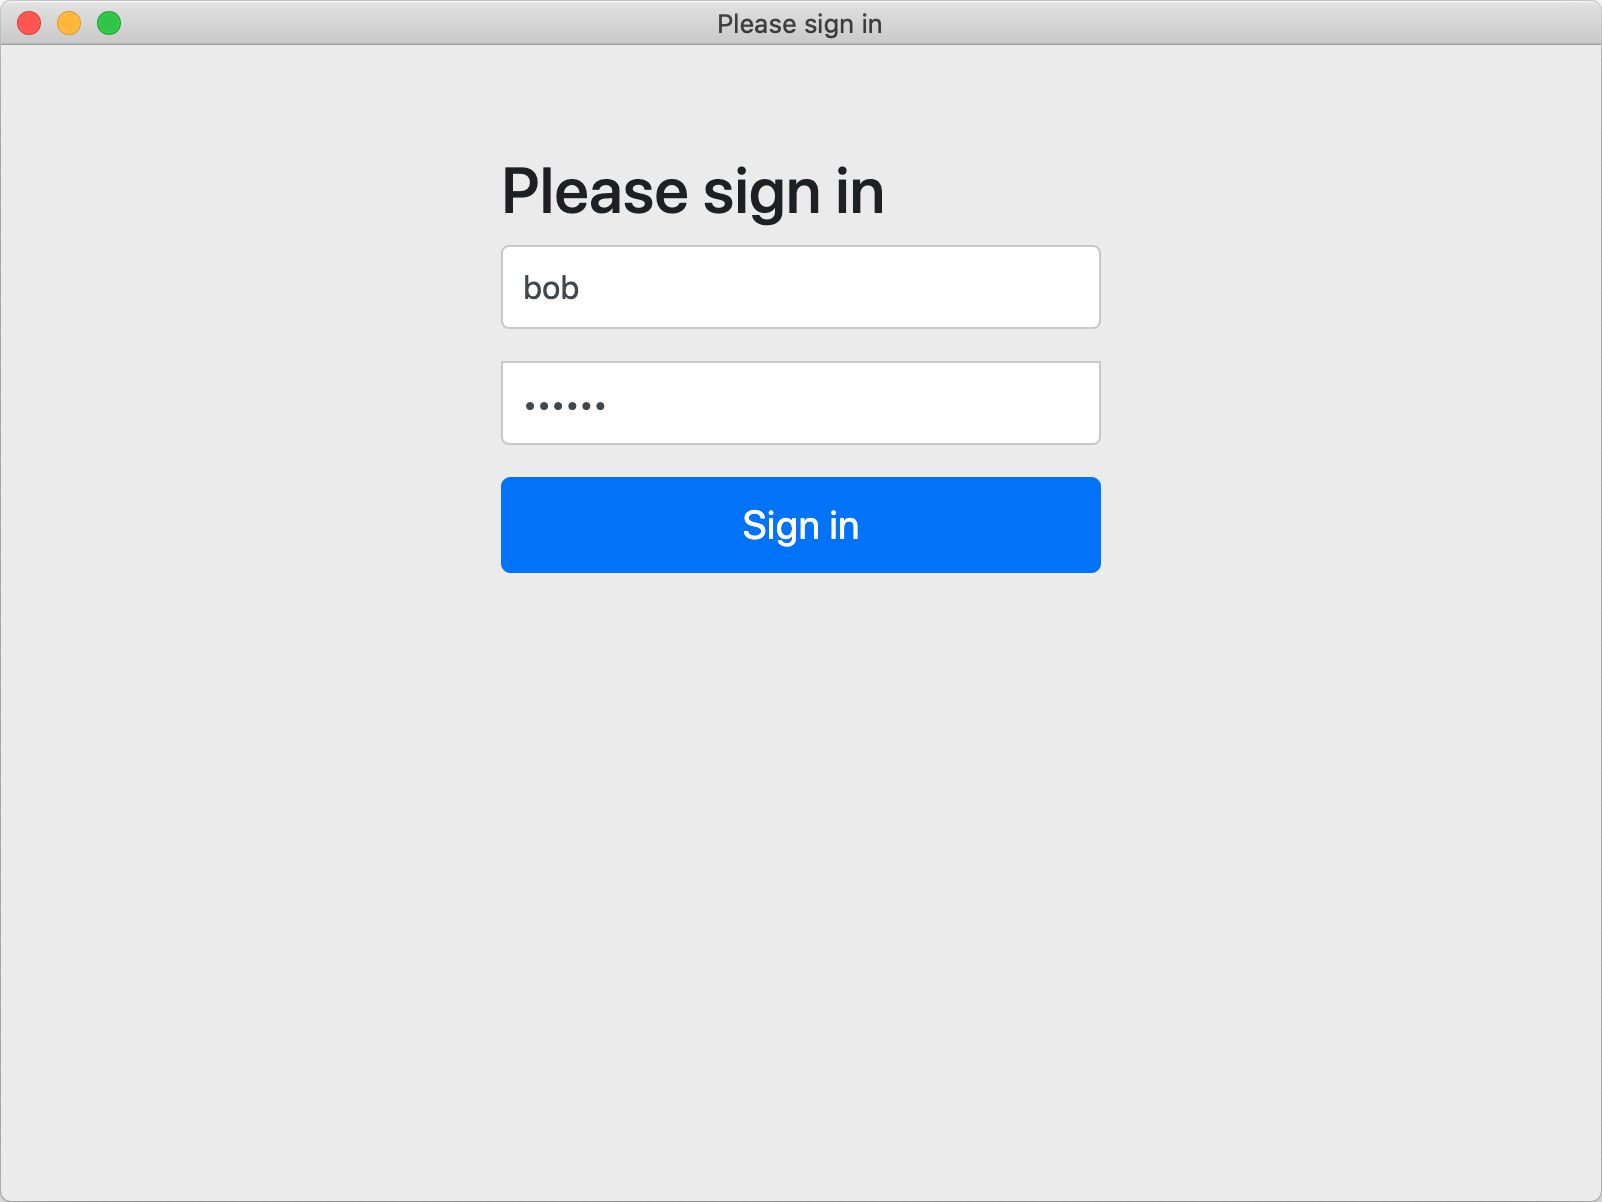
此时会跳转到 http://localhost:8081/login 登录页面
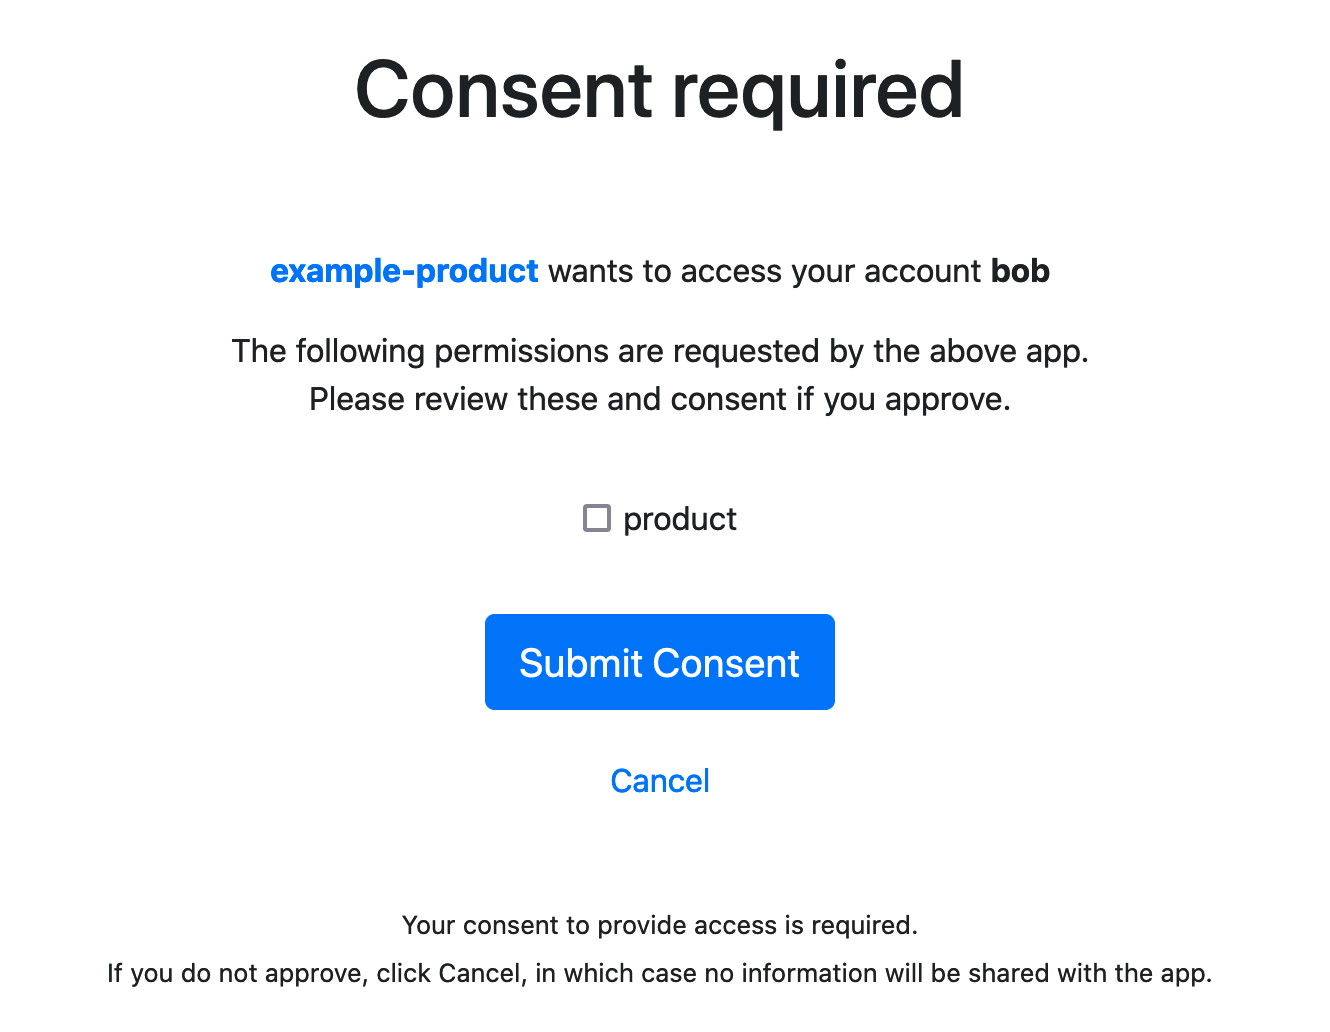
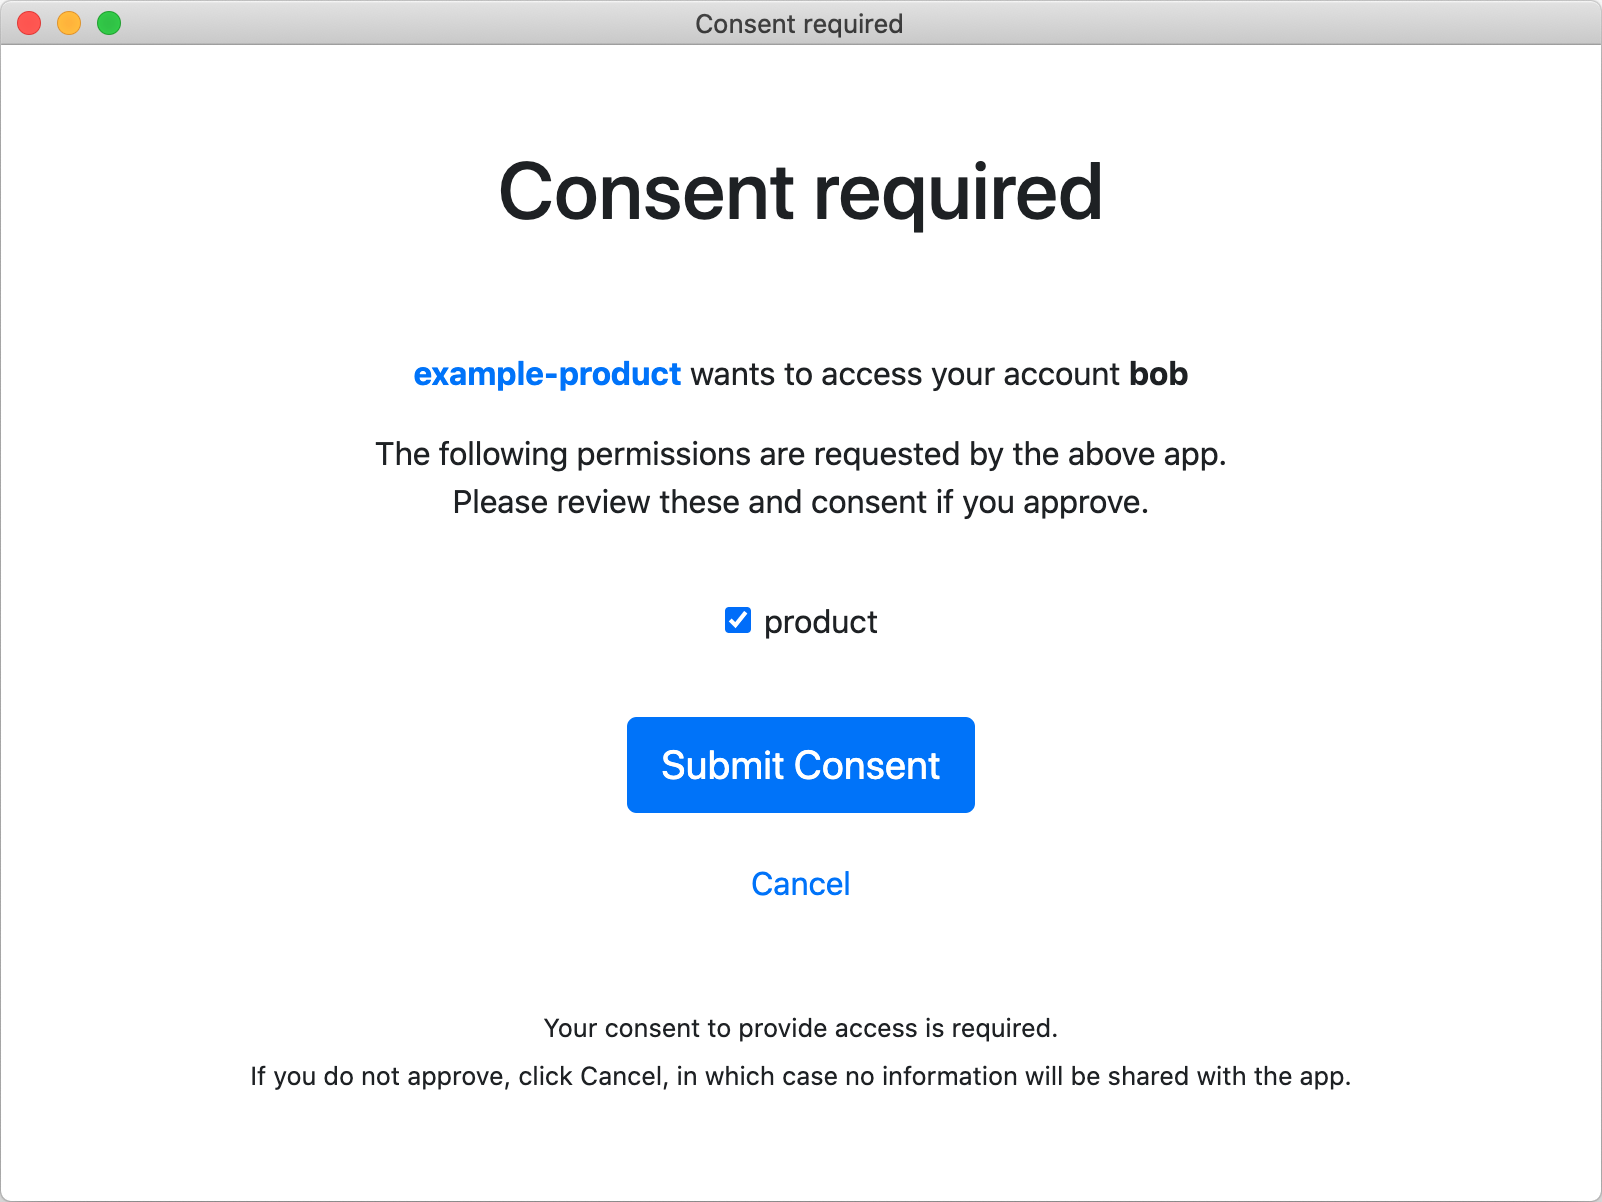
在这里输入资源拥有者的用户名和密码,即 bob 和 123456,点击 Sign in 按钮会跳转到授权页面
当我们选择好对资源的授权后,点击 Submit Consent 按钮就会跳转到我们在授权服务器配置类中配置的跳转地址,即 http://127.0.0.1:8082/callback/authorized,只是此时会携带授权码 http://127.0.0.1:8082/callback/authorized?code=sSdyOPiSOytzVwkZhOmwg_3_GS8uo_fvSjjd9MbhCDuNyYzFJ7lEnCp88vzAwFxOrbjIqr_K4srWYoQnFPsmRPg_UxYpjNIlgVM6CcavmcqusKKM8qgJCFOrcIhTSkPl&state=965236 ,code 参数的值就是授权码,state 参数的值就是我们在前面设置的随机值。
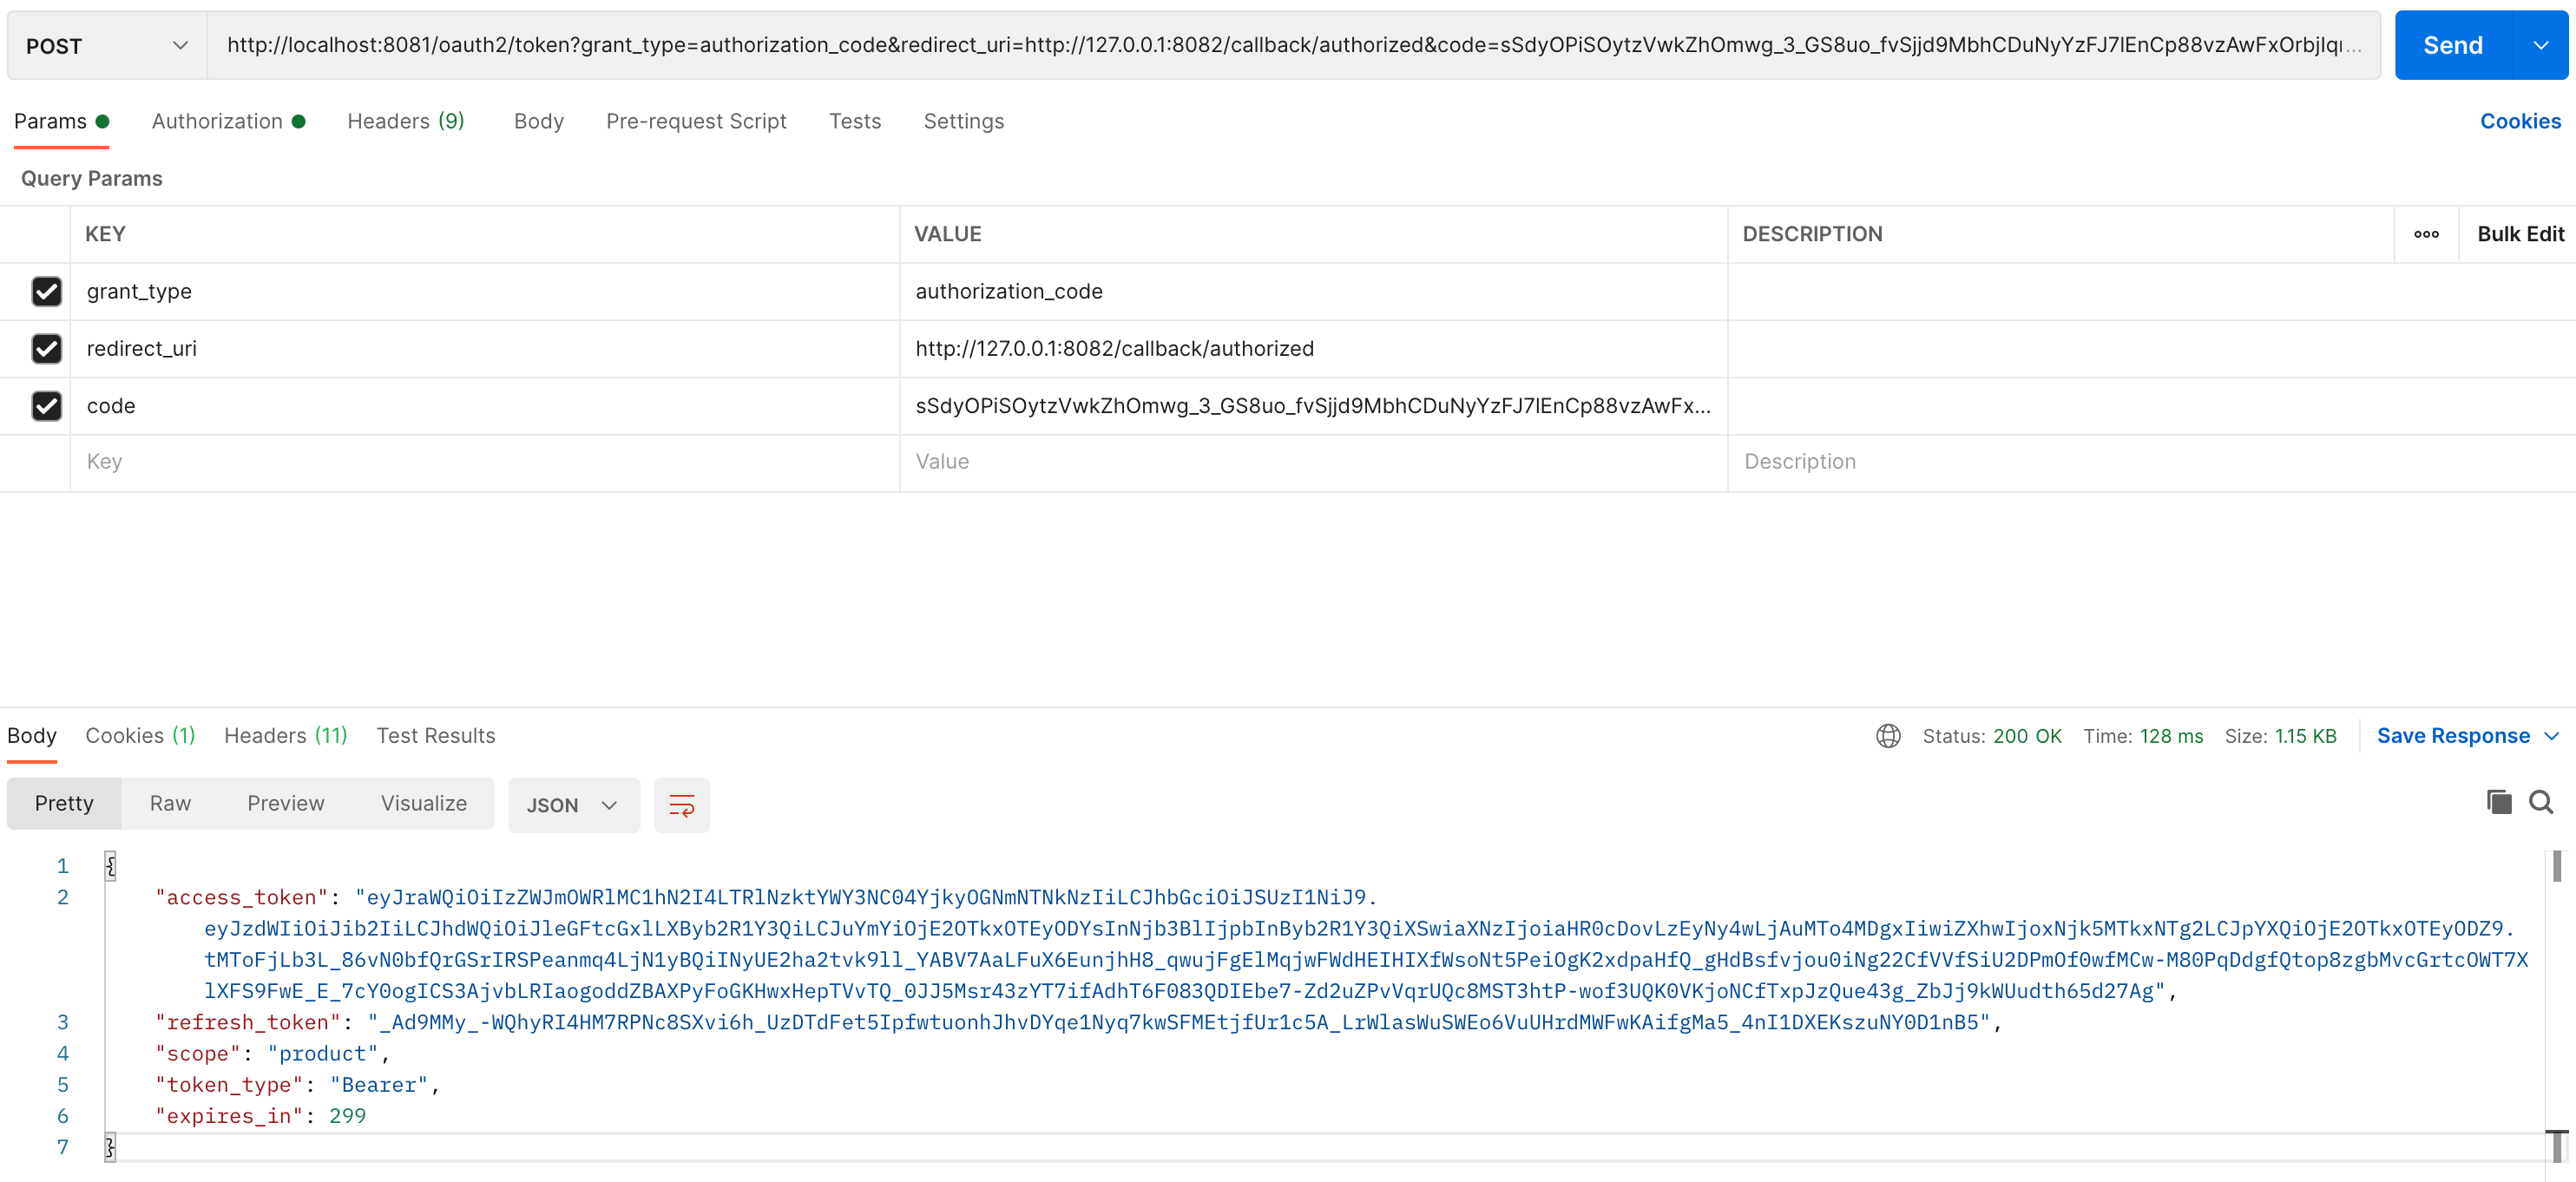
申请访问令牌 使用 Postman 访问 http://localhost:8081/oauth2/token?grant_type=authorization_code&redirect_uri=http://127.0.0.1:8082/callback/authorized&code=sSdyOPiSOytzVwkZhOmwg_3_GS8uo_fvSjjd9MbhCDuNyYzFJ7lEnCp88vzAwFxOrbjIqr_K4srWYoQnFPsmRPg_UxYpjNIlgVM6CcavmcqusKKM8qgJCFOrcIhTSkPl 获取访问令牌
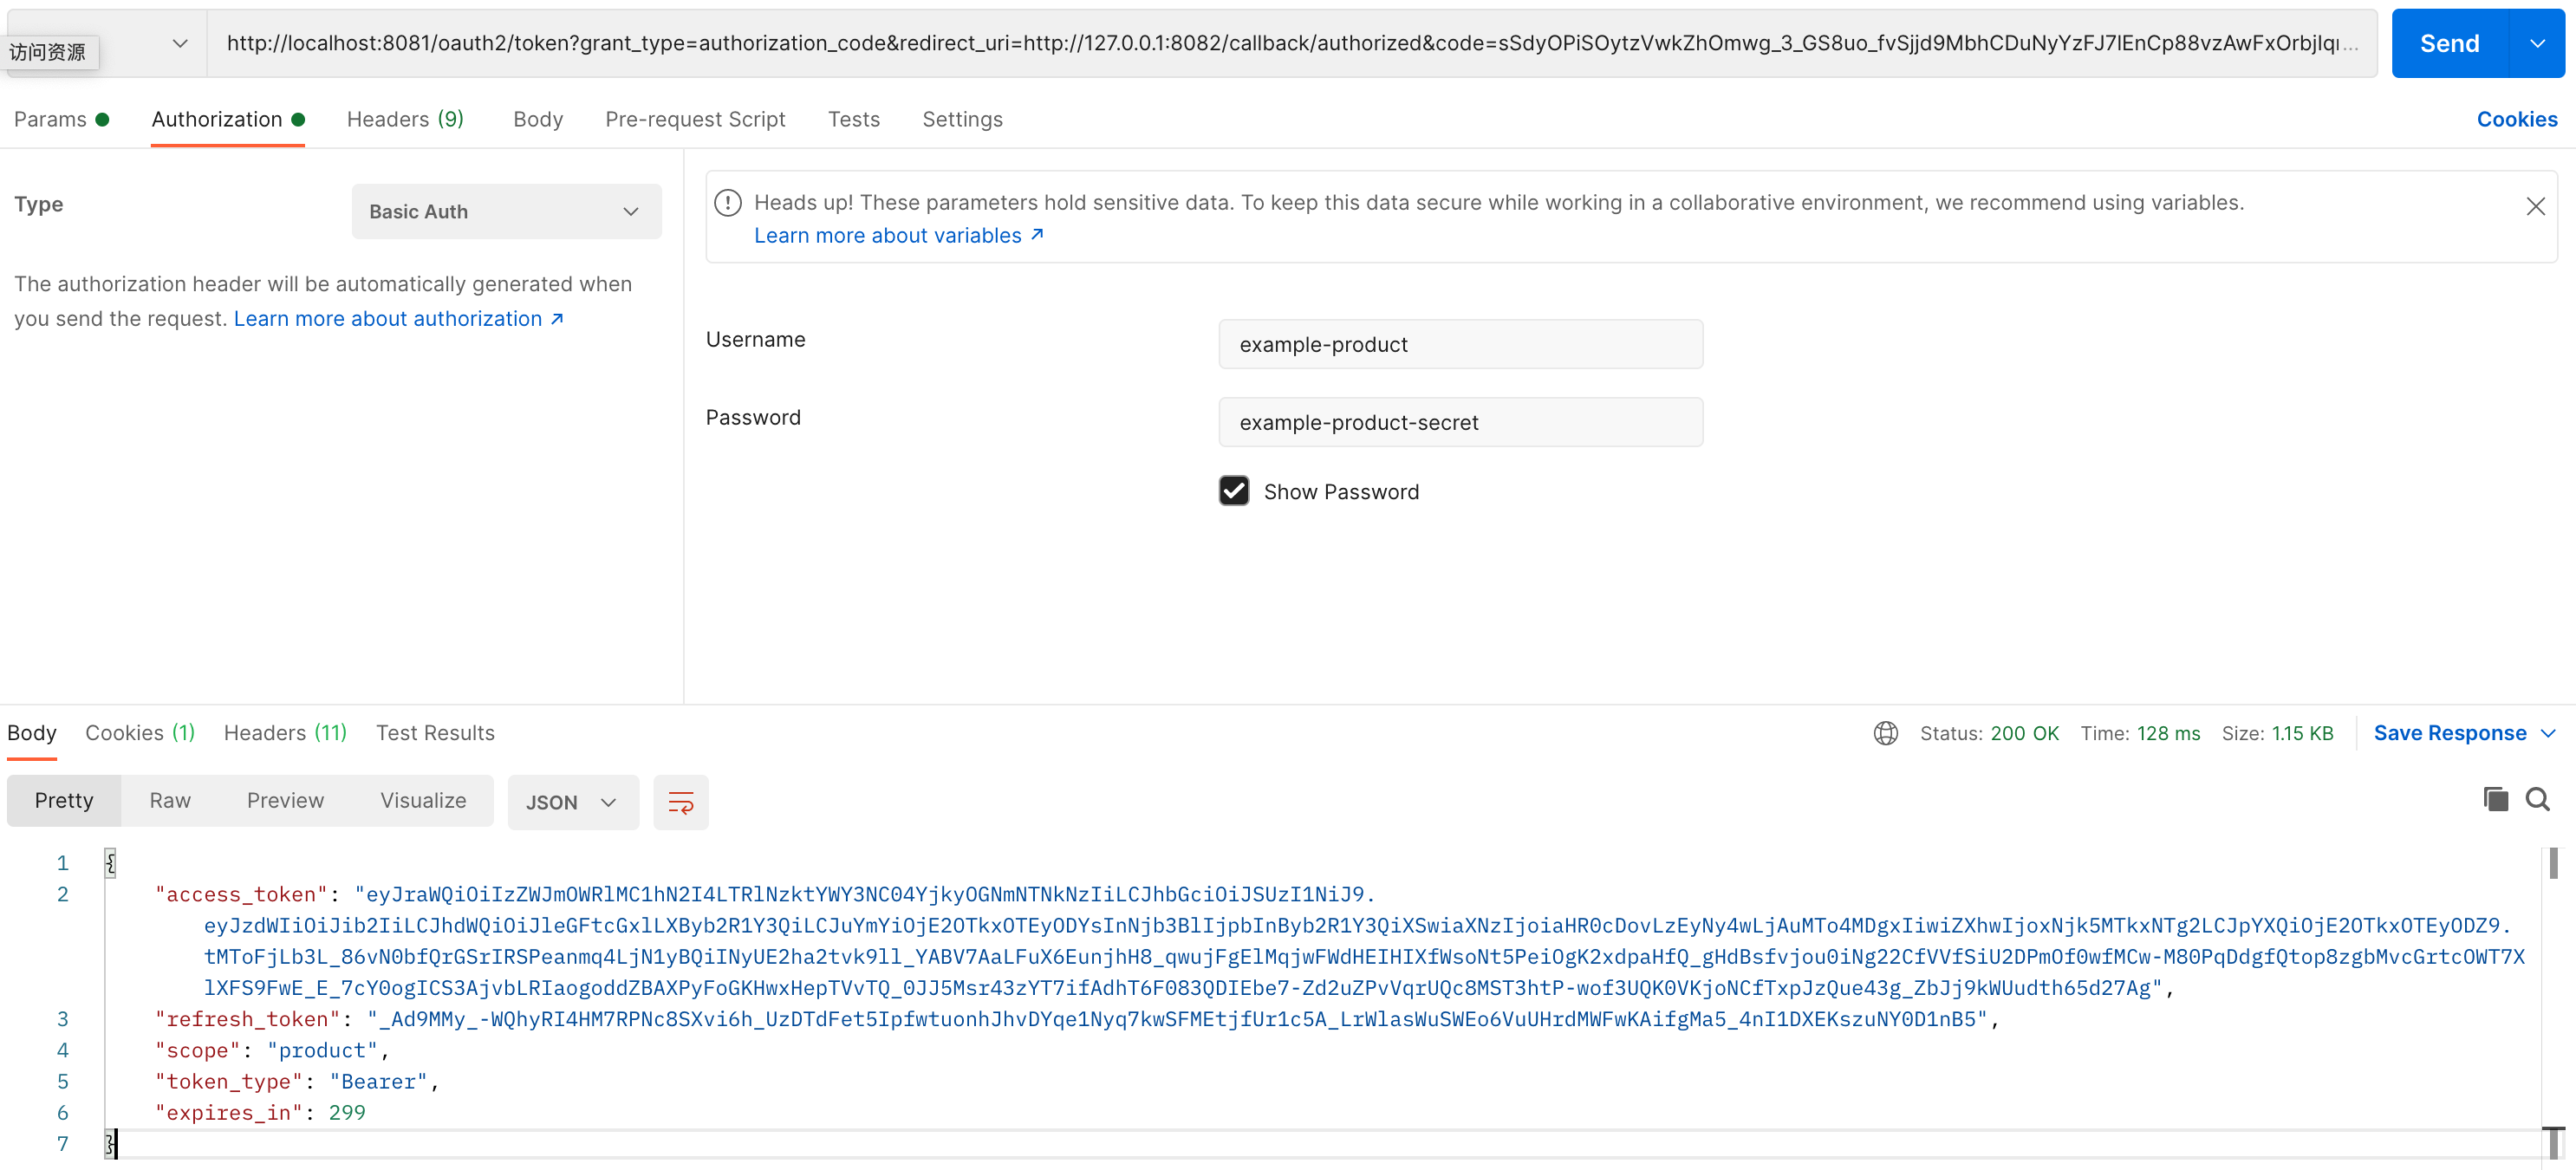
注意请求的方法为 POST,grant_type 的值为 authorization_code,redirect_uri 的值为在授权服务器配置类中配置的跳转地址 http://127.0.0.1:8082/callback/authorized,code 的值为在前面获取的授权码 sSdyOPiSOytzVwkZhOmwg_3_GS8uo_fvSjjd9MbhCDuNyYzFJ7lEnCp88vzAwFxOrbjIqr_K4srWYoQnFPsmRPg_UxYpjNIlgVM6CcavmcqusKKM8qgJCFOrcIhTSkPl。另外需要注意需要配置 Authorization 参数,具体的配置如下,Type 需要选择 Basic Auth,这个值要与授权服务器中配置的授权方式,即 clientAuthenticationMethod(ClientAuthenticationMethod.CLIENT_SECRET_BASIC),一致;Username 和 Password 分别是在授权服务器配置类中配置的客户端 ID 和客户端密码
配置 Authorization 后就会自动的在请求头中添加 Authorization 请求头,它的值为 Basic ZXhhbXBsZS1wcm9kdWN0OmV4YW1wbGUtcHJvZHVjdC1zZWNyZXQ=,也就是由 Postman 帮我们做了 Basic 认证的参数格式组装和 Base64 编码。发送请求后我们会得到如下的返回结果
1 2 3 4 5 6 7 { "access_token" : "eyJraWQiOiIzZWJmOWRlMC1hN2I4LTRlNzktYWY3NC04YjkyOGNmNTNkNzIiLCJhbGciOiJSUzI1NiJ9.eyJzdWIiOiJib2IiLCJhdWQiOiJleGFtcGxlLXByb2R1Y3QiLCJuYmYiOjE2OTkxOTEyODYsInNjb3BlIjpbInByb2R1Y3QiXSwiaXNzIjoiaHR0cDovLzEyNy4wLjAuMTo4MDgxIiwiZXhwIjoxNjk5MTkxNTg2LCJpYXQiOjE2OTkxOTEyODZ9.tMToFjLb3L_86vN0bfQrGSrIRSPeanmq4LjN1yBQiINyUE2ha2tvk9ll_YABV7AaLFuX6EunjhH8_qwujFgElMqjwFWdHEIHIXfWsoNt5PeiOgK2xdpaHfQ_gHdBsfvjou0iNg22CfVVfSiU2DPmOf0wfMCw-M80PqDdgfQtop8zgbMvcGrtcOWT7XlXFS9FwE_E_7cY0ogICS3AjvbLRIaogoddZBAXPyFoGKHwxHepTVvTQ_0JJ5Msr43zYT7ifAdhT6F083QDIEbe7-Zd2uZPvVqrUQc8MST3htP-wof3UQK0VKjoNCfTxpJzQue43g_ZbJj9kWUudth65d27Ag" , "refresh_token" : "_Ad9MMy_-WQhyRI4HM7RPNc8SXvi6h_UzDTdFet5IpfwtuonhJhvDYqe1Nyq7kwSFMEtjfUr1c5A_LrWlasWuSWEo6VuUHrdMWFwKAifgMa5_4nI1DXEKszuNY0D1nB5" , "scope" : "product" , "token_type" : "Bearer" , "expires_in" : 299 }
其中的 access_token 就是我们的访问令牌。
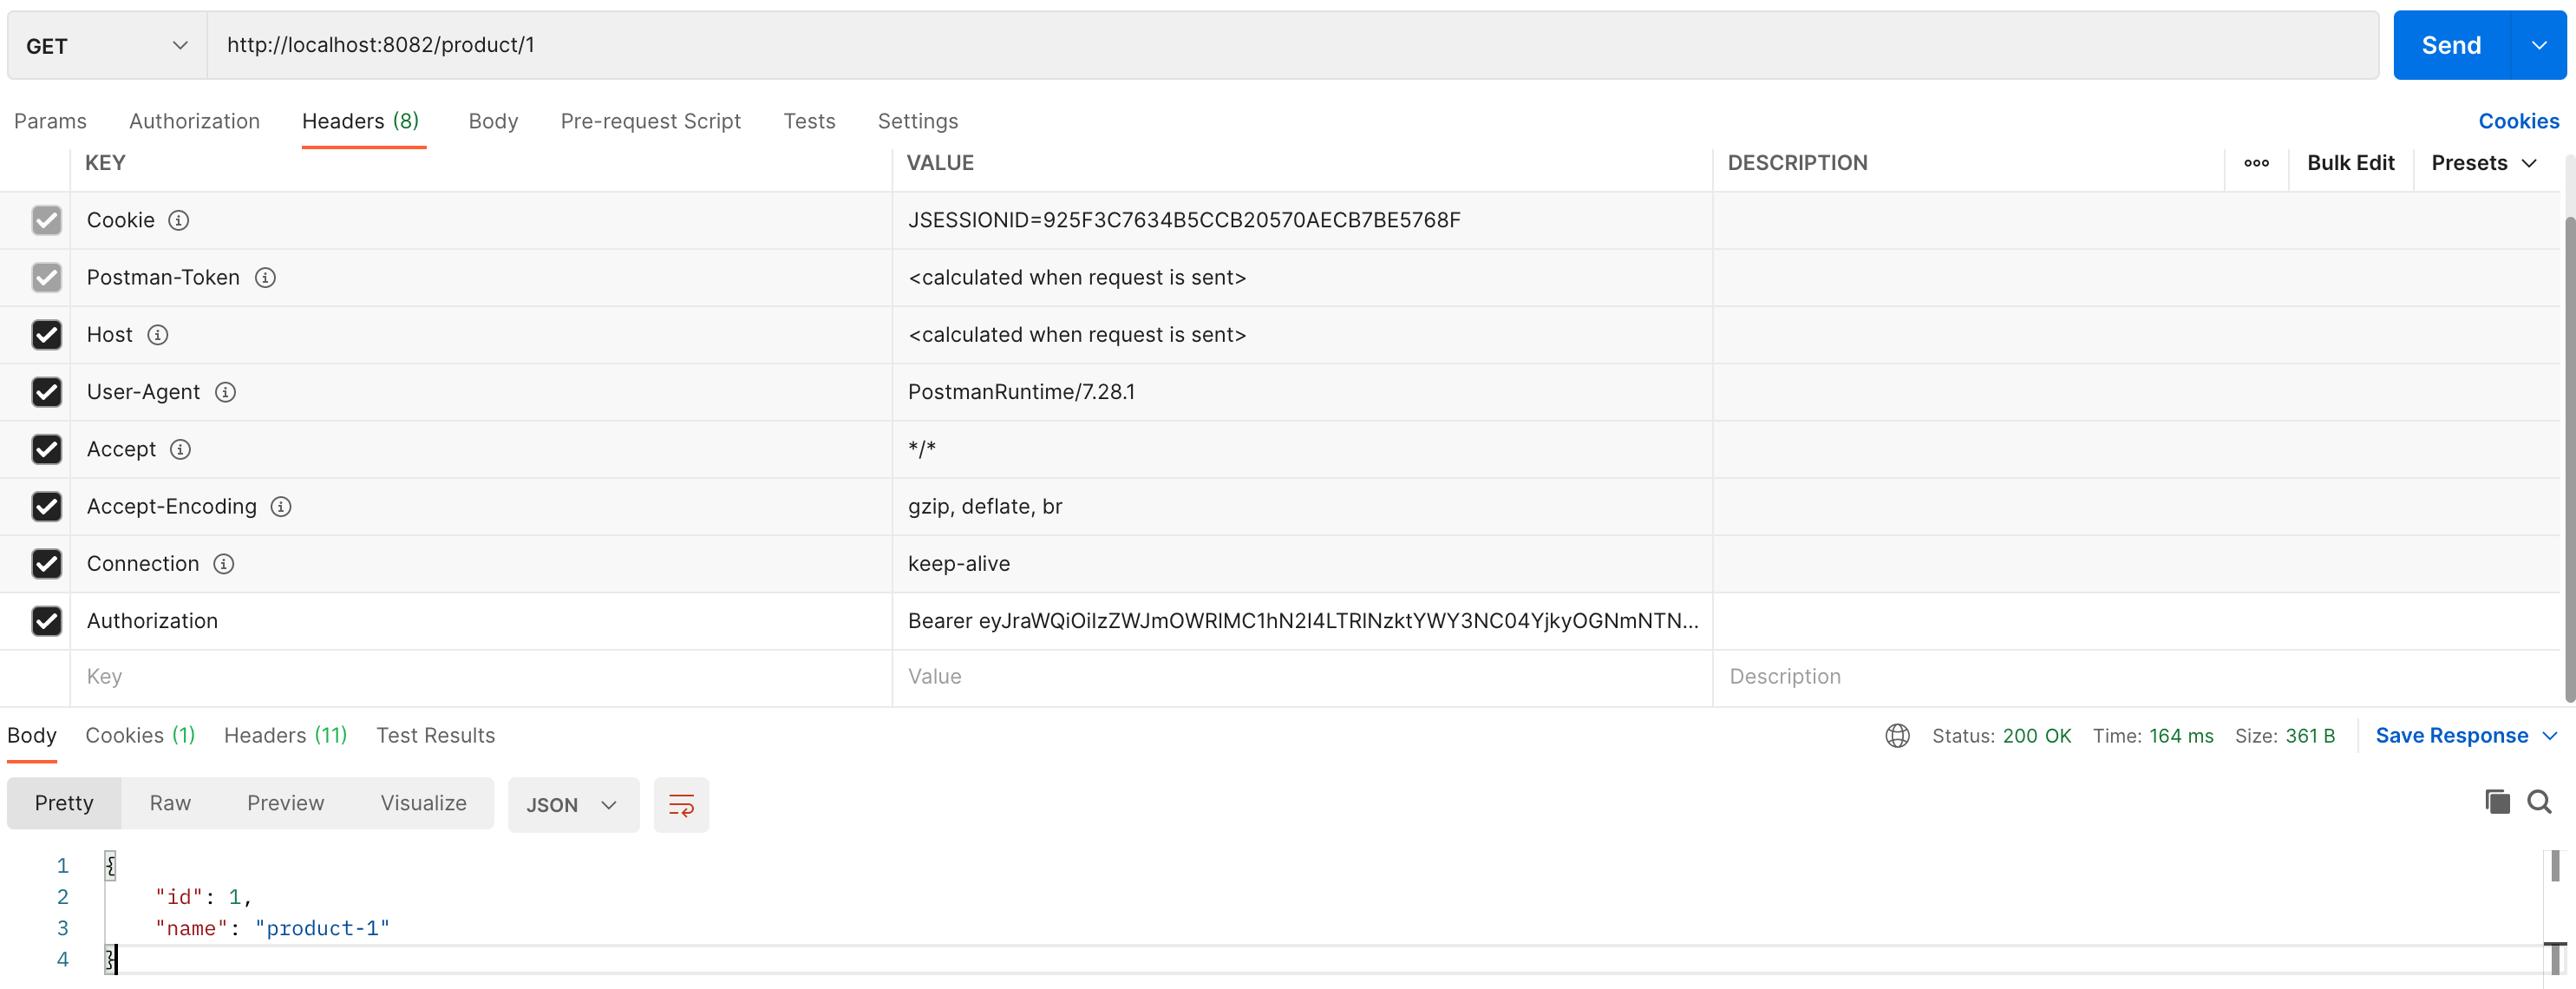
访问受保护资源 下面我们就可以用访问令牌访问受保护的资源了,其中 Authorization 由两部分组成,第一部分是申请访问令牌返回结果中的 token_type 的值 Bearer,第二部分是申请访问令牌返回结果中的 access_token 的值 eyJraWQiOiIzZWJmOWRlMC1hN2I4LTRlNzktYWY3NC04YjkyOGNmNTNkNzIiLCJhbGciOiJSUzI1NiJ9.eyJzdWIiOiJib2IiLCJhdWQiOiJleGFtcGxlLXByb2R1Y3QiLCJuYmYiOjE2OTkxOTEyODYsInNjb3BlIjpbInByb2R1Y3QiXSwiaXNzIjoiaHR0cDovLzEyNy4wLjAuMTo4MDgxIiwiZXhwIjoxNjk5MTkxNTg2LCJpYXQiOjE2OTkxOTEyODZ9.tMToFjLb3L_86vN0bfQrGSrIRSPeanmq4LjN1yBQiINyUE2ha2tvk9ll_YABV7AaLFuX6EunjhH8_qwujFgElMqjwFWdHEIHIXfWsoNt5PeiOgK2xdpaHfQ_gHdBsfvjou0iNg22CfVVfSiU2DPmOf0wfMCw-M80PqDdgfQtop8zgbMvcGrtcOWT7XlXFS9FwE_E_7cY0ogICS3AjvbLRIaogoddZBAXPyFoGKHwxHepTVvTQ_0JJ5Msr43zYT7ifAdhT6F083QDIEbe7-Zd2uZPvVqrUQc8MST3htP-wof3UQK0VKjoNCfTxpJzQue43g_ZbJj9kWUudth65d27Ag
我们可以使用这个地址 http://localhost:8081/oauth2/authorize?client_id=example-product&scope=user&state=965236&response_type=code&redirect_uri=http://127.0.0.1:8082/callback/authorized 申请授权码,这个地址除了 scope 参数变成了 user 其他均没有变化。在授权页面同意对 user 的授权,然后用这个授权码去申请访问令牌,最后用访问令牌去访问受保护资源,此时我们得到 403 Forbidden 响应结果。
这证明我们的 @PreAuthorize("hasAuthority('SCOPE_product')") 是起作用了的。当我们使用 https://jwt.io 这个网站解析 access_token 时返回结果如下所示
1 2 3 4 5 6 7 8 9 10 11 { "sub" : "bob" , "aud" : "example-product" , "nbf" : 1699192555 , "scope" : [ "user" ] , "iss" : "http://127.0.0.1:8081" , "exp" : 1699192855 , "iat" : 1699192555 }
我们发现 scope 属性中没有 @PreAuthorize 注解中要求的 product,因此访问资源被拒绝了。
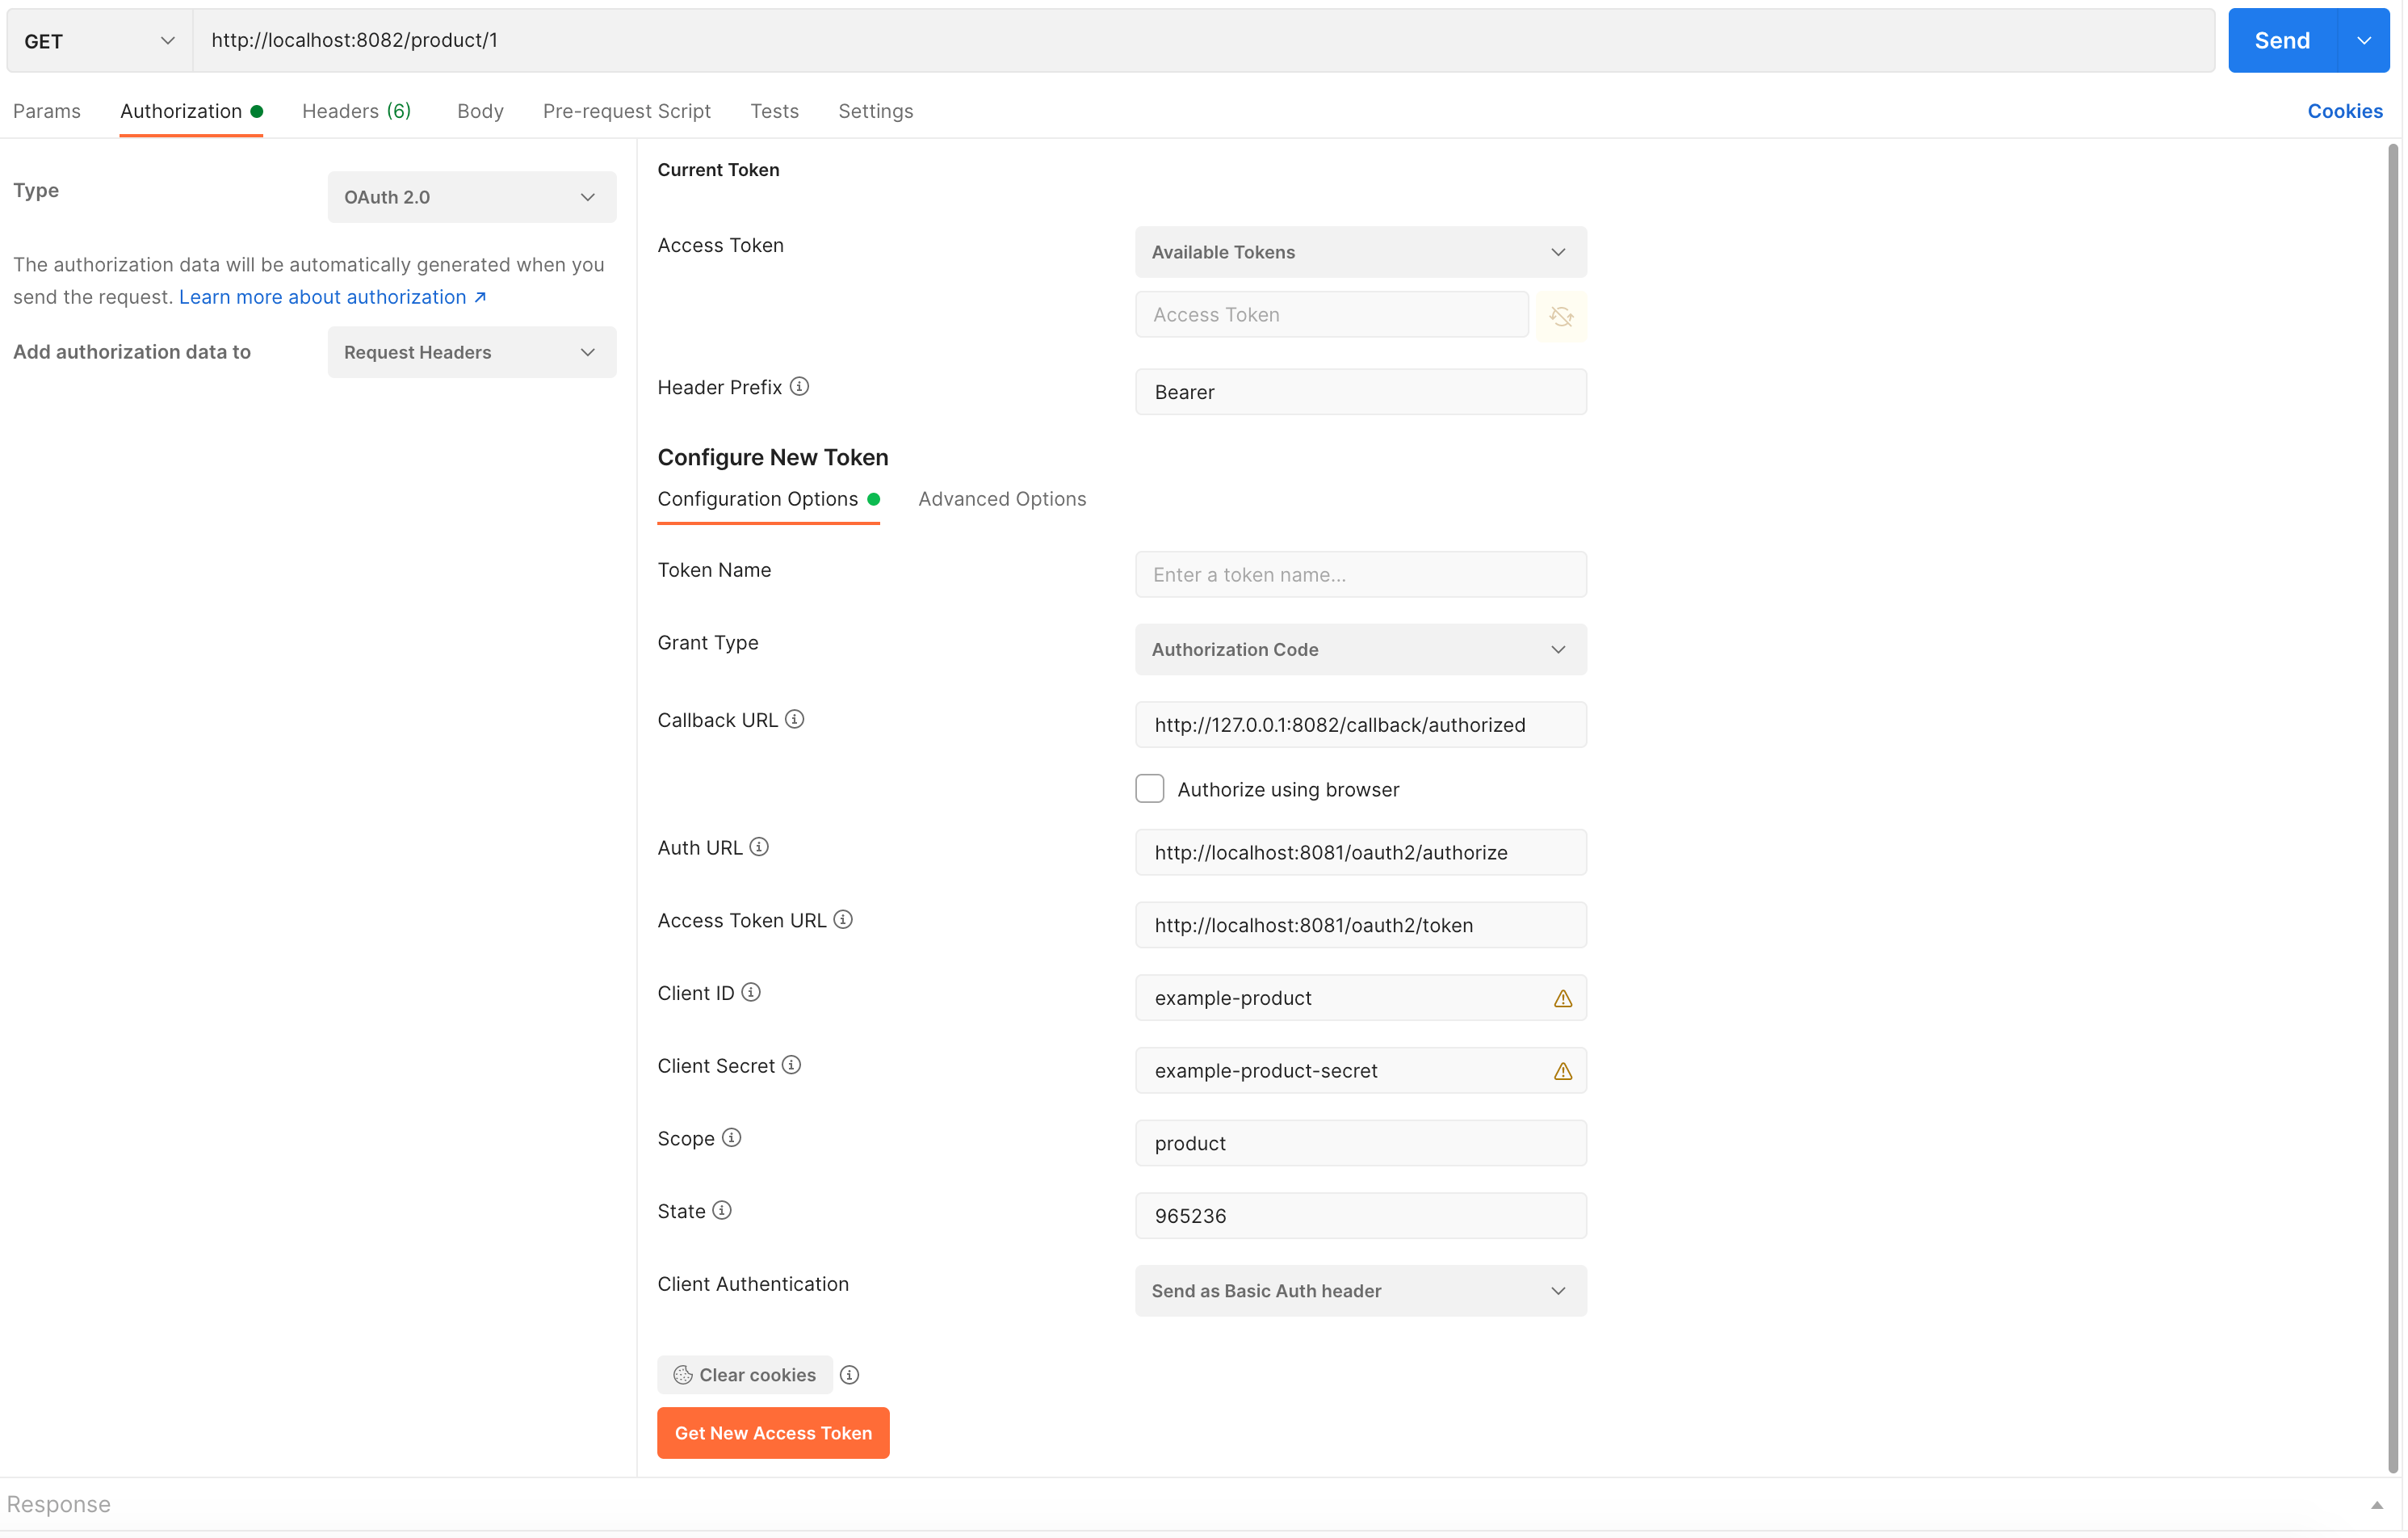
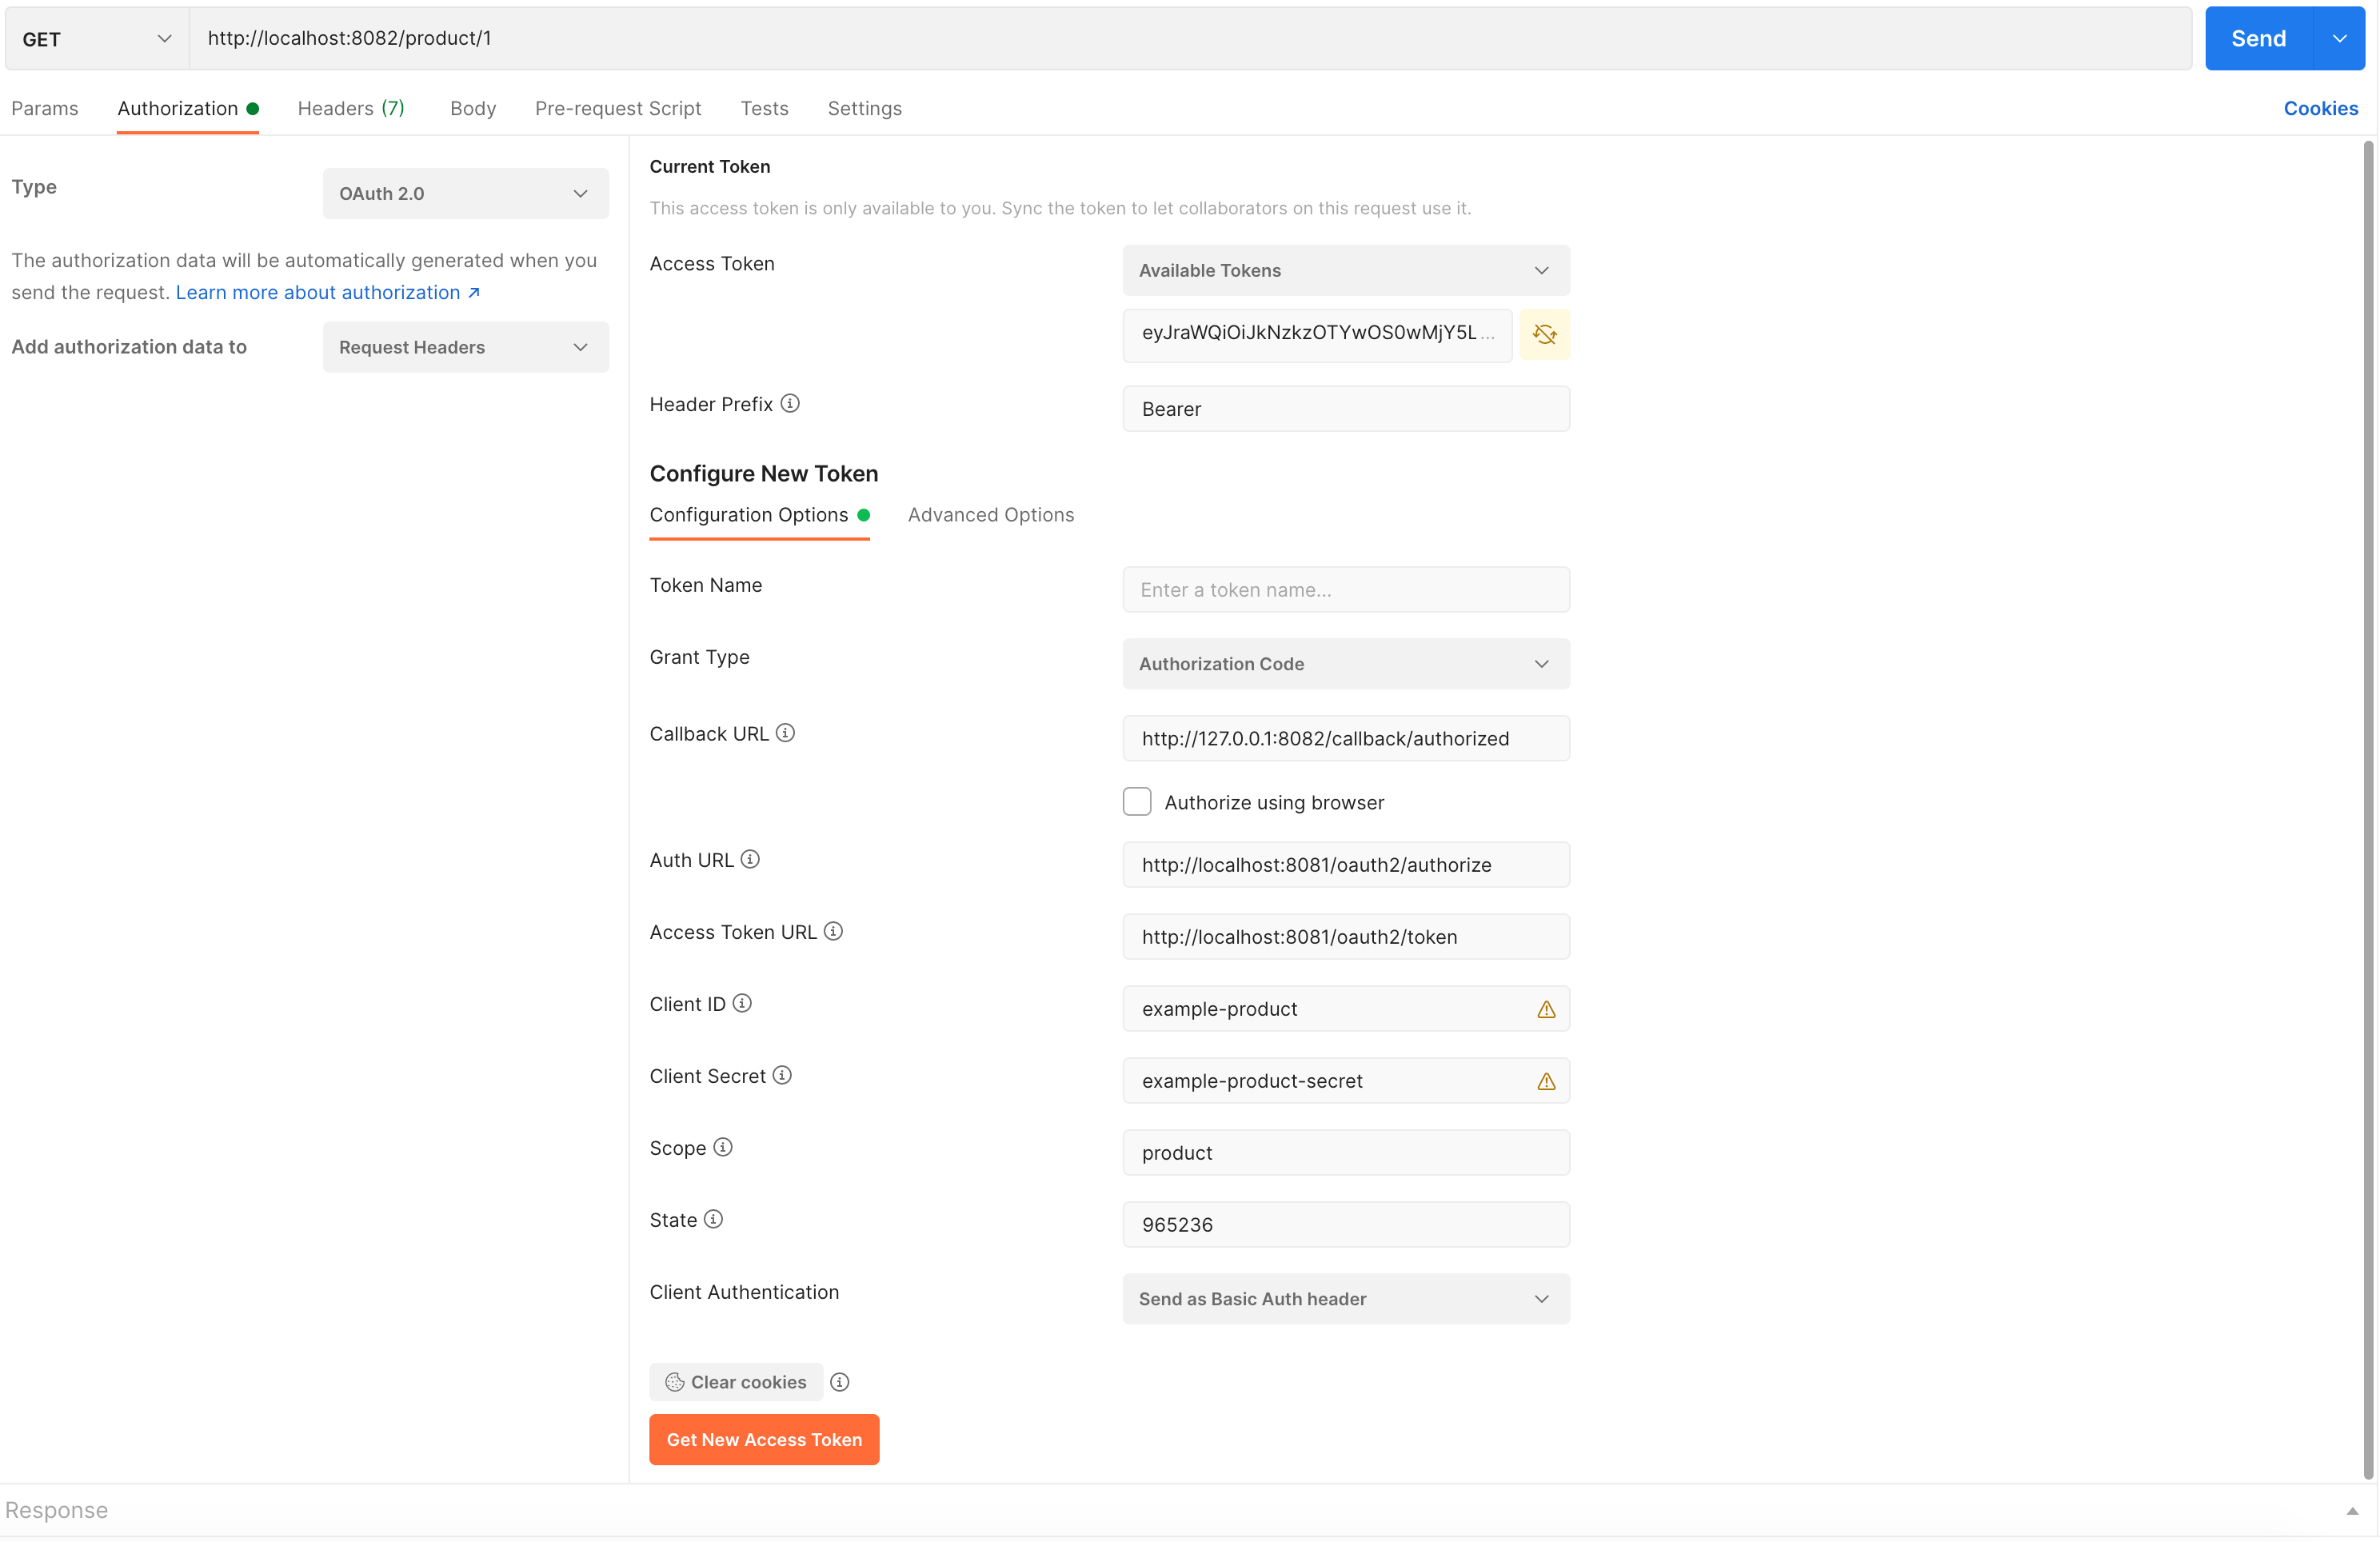
使用 Postman 访问受保护的资源 在前面我们使用 Web Browser 和 Postman 分步骤地演示了客户端需要做的事情,下面我们完全使用 Postman 承担客户端的角色,在一个地方完成所有的事情,这更能接近真实的场景
在 Postman 中打开新请求选项卡
选择 HTTP Method 为 GET,然后输入 URL:http://localhost:8082/product/1
转到 Authorization 选项, 选择 Type 为 OAuth 2.0
在 Configure New Token 部分:
Grant Type: Authorization Code
Callback URL: http://127.0.0.1:8082/callback/authorized
Auth URL: http://localhost:8081/oauth2/authorize
Access Token URL: http://localhost:8081/oauth2/token
Client ID: example-product
Client Secret: example-product-secret
Scope: product
State: 965236
Client Authentication: Send as Basic Auth header
点击 Get New Access Token 按钮
Postman 会弹出 Keycloak 登录页面
使用用户凭证 bob/123456 登录
进行用户授权操作
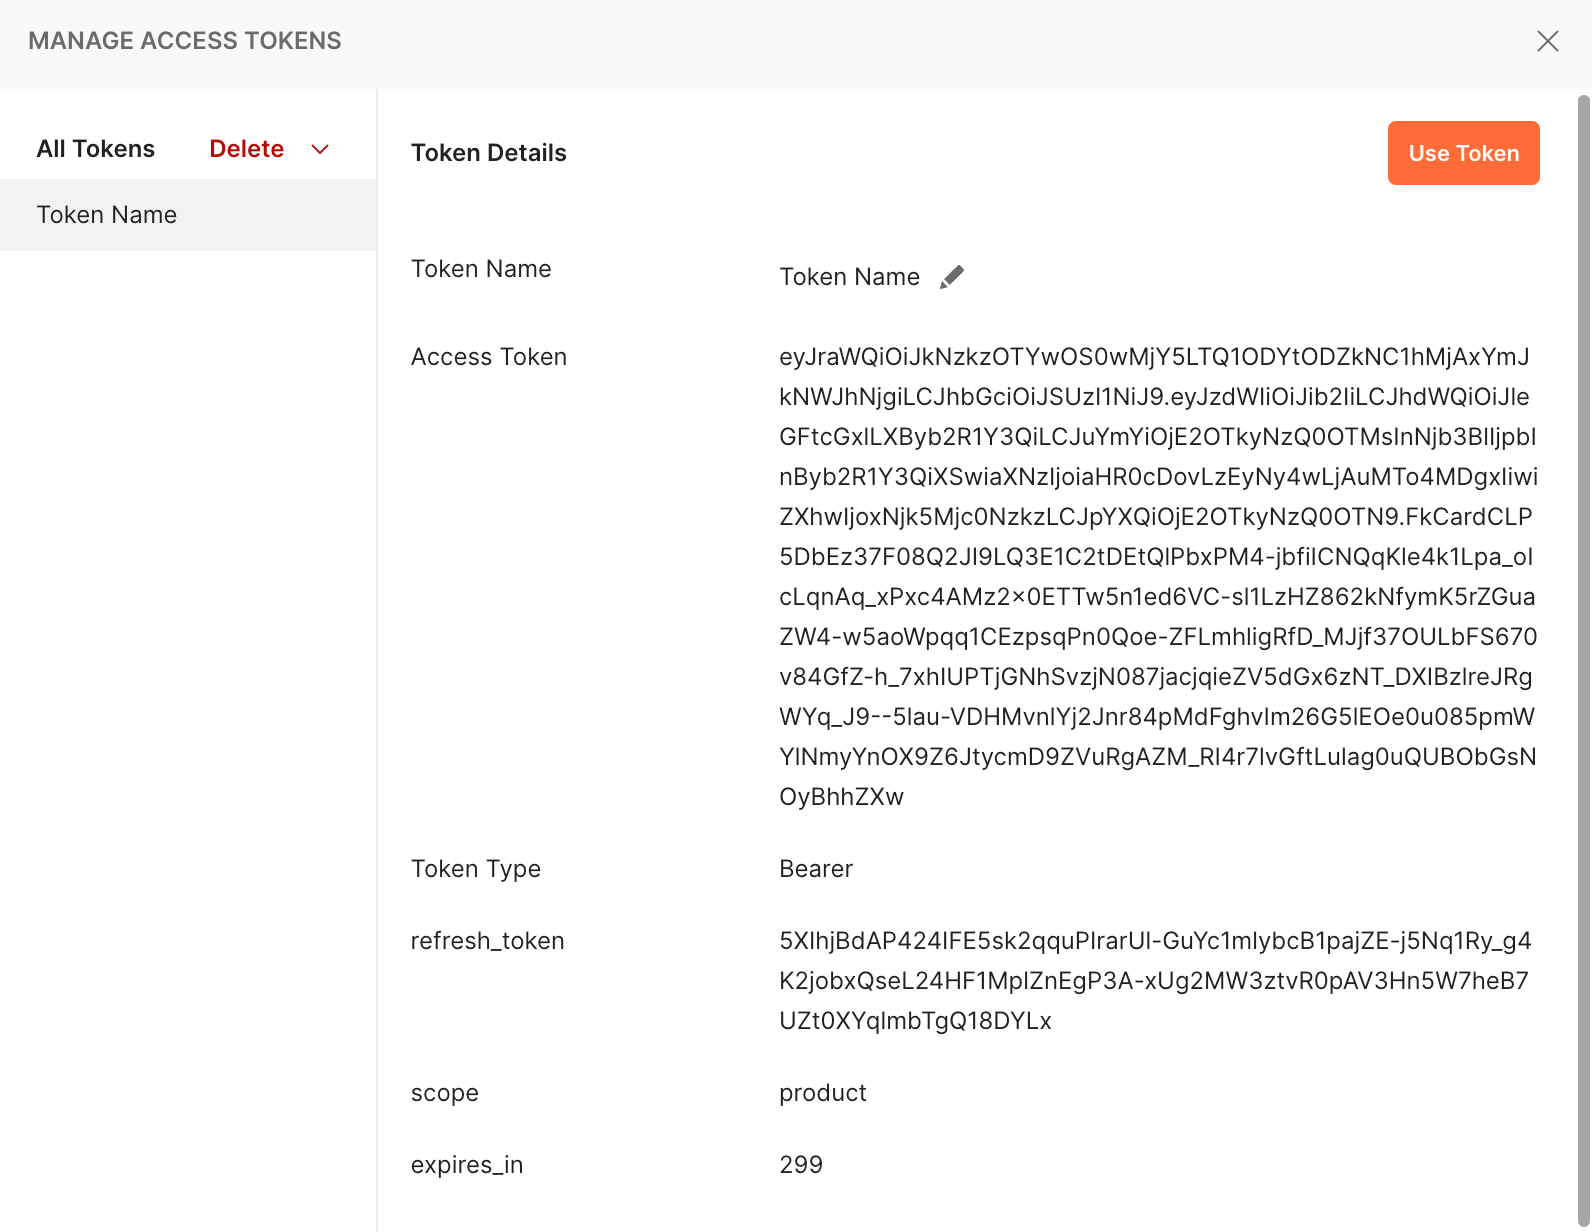
现在你应该可以看到带有 Token 详细信息的响应了
点击 Use Token 按钮,你应该看到 Access Token 部分已经有值了
点击 Send 按钮访问受保护资源
参考资料
Spring Authorization Server Reference - Getting Started Spring Security 6.x 系列【28】授权服务器篇之Spring Authorization Server 1.0 入门案例 Spring Security OAuth Authorization Server Spring Security OAuth 2 教程 - 8:资源服务器

