Spring Security OAuth 的生命周期已经结束,官方已经删除它的文档,现在推荐使用 Spring Authorization Server,但是还是有很多老项目在继续使用 Spring Security OAuth,学习它仍然是必要的。虽然官方文档已经删除了,但是找到了一篇较早时间的翻译 Spring Security OAuth2 开发指南,可以作为实践的基础。网络上也有很多如何使用它的文章,这篇文章是自己实践的一点记录。
关于 OAuth2 的基本概念和授权流程不再赘述,可以参考 OAuth 2.0 和 The OAuth 2.0 Authorization Framework 进行学习。在我们构建的例子中虚拟用户 Bob 是 Resource Owner,example-user 工程是 Resource Server,Web Browser 和 Postman 充当了 Client,而工程 example-auth 是 Authorization Server。完整的项目目录结构如下所示
1
2
3
4
5
6
7
8
9
10
11
12
13
14
15
16
17
18
19
20
21
22
23
24
25
26
27
28
29
30
31
32
33
34
| ├── example-auth
│ ├── pom.xml
│ └── src
│ └── main
│ ├── java
│ │ └── com
│ │ └── example
│ │ └── auth
│ │ ├── ExampleAuthApplication.java # 启动类
│ │ └── config
│ │ ├── OAuth2AuthorizationServerConfig.java # 授权服务器配置类
│ │ └── WebSecurityConfig.java # Web 安全配置类
│ └── resources
│ └── application.yml # 配置文件
├── example-user
│ ├── pom.xml
│ └── src
│ └── main
│ ├── java
│ │ └── com
│ │ └── example
│ │ └── user
│ │ ├── ExampleUserApplication.java # 启动类
│ │ ├── config
│ │ │ ├── MethodSecurityConfig.java # 方法安全配置类
│ │ │ ├── OAuth2ResourceServerConfig.java # 资源服务器配置类
│ │ │ └── WebSecurityConfig.java # Web 安全配置类
│ │ ├── controller
│ │ │ └── UserController.java # 资源接口类
│ │ └── entity
│ │ └── User.java # 资源类
│ └── resources
│ └── application.yml # 配置文件
└── pom.xml
|
主要依赖的版本如下所示
org.springframework.boot:spring-boot-starter-parent:2.7.15org.springframework.security.oauth:spring-security-oauth2:2.5.2.RELEASE
下面就让我们来从零开始构建上面这样一个项目。
授权服务器
依赖配置
授权服务器的依赖配置 pom.xml 如下所示
1
2
3
4
5
6
7
8
9
10
11
12
13
14
15
16
17
18
19
20
21
22
23
24
25
26
27
28
29
30
31
32
33
34
35
36
37
38
39
40
41
42
43
44
45
46
47
48
| <?xml version="1.0" encoding="UTF-8"?>
<project xmlns="http://maven.apache.org/POM/4.0.0"
xmlns:xsi="http://www.w3.org/2001/XMLSchema-instance"
xsi:schemaLocation="http://maven.apache.org/POM/4.0.0 http://maven.apache.org/xsd/maven-4.0.0.xsd">
<modelVersion>4.0.0</modelVersion>
<parent>
<groupId>com.example</groupId>
<artifactId>example-oauth2</artifactId>
<version>0.0.1-SNAPSHOT</version>
</parent>
<artifactId>example-auth</artifactId>
<dependencies>
<dependency>
<groupId>org.springframework.boot</groupId>
<artifactId>spring-boot-starter-web</artifactId>
</dependency>
<dependency>
<groupId>org.springframework.security.oauth</groupId>
<artifactId>spring-security-oauth2</artifactId>
<version>2.5.2.RELEASE</version>
</dependency>
<dependency>
<groupId>org.projectlombok</groupId>
<artifactId>lombok</artifactId>
<optional>true</optional>
</dependency>
</dependencies>
<build>
<plugins>
<plugin>
<groupId>org.springframework.boot</groupId>
<artifactId>spring-boot-maven-plugin</artifactId>
<configuration>
<excludes>
<exclude>
<groupId>org.projectlombok</groupId>
<artifactId>lombok</artifactId>
</exclude>
</excludes>
</configuration>
</plugin>
</plugins>
</build>
</project>
|
端口配置
我们给授权服务器分配的端口为 9090,配置在 application.yml 文件中
Web 安全配置
Web 安全配置类 WebSecurityConfig 的代码如下所示
1
2
3
4
5
6
7
8
9
10
11
12
13
14
15
16
17
18
19
20
21
22
23
24
25
26
27
28
29
30
31
32
33
34
35
| import org.springframework.context.annotation.Bean;
import org.springframework.context.annotation.Configuration;
import org.springframework.security.authentication.AuthenticationManager;
import org.springframework.security.config.annotation.authentication.builders.AuthenticationManagerBuilder;
import org.springframework.security.config.annotation.web.builders.HttpSecurity;
import org.springframework.security.config.annotation.web.configuration.EnableWebSecurity;
import org.springframework.security.config.annotation.web.configuration.WebSecurityConfigurerAdapter;
@Configuration
@EnableWebSecurity
public class WebSecurityConfig extends WebSecurityConfigurerAdapter {
@Override
protected void configure(AuthenticationManagerBuilder auth) throws Exception {
auth.inMemoryAuthentication()
.withUser("bob")
.password("{noop}123456")
.roles("admin");
}
@Override
protected void configure(HttpSecurity http) throws Exception {
http.formLogin().permitAll();
http.authorizeHttpRequests()
.antMatchers("/login", "/oauth/**").permitAll()
.anyRequest().authenticated();
http.csrf().disable();
}
@Bean
@Override
public AuthenticationManager authenticationManagerBean() throws Exception {
return super.authenticationManagerBean();
}
}
|
在 Web 安全配置类中我们需要放行对 /login 和 /oauth/** 两类资源的请求,不然就没法做登录和授权了。
授权服务器配置
1
2
3
4
5
6
7
8
9
10
11
12
13
14
15
16
17
18
19
20
21
22
23
24
25
26
27
28
29
30
31
32
33
34
35
36
37
38
39
40
41
42
43
44
45
46
47
| import org.springframework.beans.factory.annotation.Autowired;
import org.springframework.context.annotation.Bean;
import org.springframework.context.annotation.Configuration;
import org.springframework.security.authentication.AuthenticationManager;
import org.springframework.security.oauth2.config.annotation.configurers.ClientDetailsServiceConfigurer;
import org.springframework.security.oauth2.config.annotation.web.configuration.AuthorizationServerConfigurerAdapter;
import org.springframework.security.oauth2.config.annotation.web.configuration.EnableAuthorizationServer;
import org.springframework.security.oauth2.config.annotation.web.configurers.AuthorizationServerEndpointsConfigurer;
import org.springframework.security.oauth2.config.annotation.web.configurers.AuthorizationServerSecurityConfigurer;
import org.springframework.security.oauth2.provider.token.TokenStore;
import org.springframework.security.oauth2.provider.token.store.InMemoryTokenStore;
@Configuration
@EnableAuthorizationServer
public class OAuth2AuthorizationServerConfig extends AuthorizationServerConfigurerAdapter {
@Autowired
private AuthenticationManager authenticationManager;
@Override
public void configure(AuthorizationServerSecurityConfigurer security) throws Exception {
security.checkTokenAccess("permitAll()")
.allowFormAuthenticationForClients();
}
@Override
public void configure(ClientDetailsServiceConfigurer clients) throws Exception {
clients.inMemory()
.withClient("example-client")
.secret("{noop}example-client-secret")
.autoApprove(false)
.redirectUris("https://www.baidu.com")
.scopes("user", "product")
.accessTokenValiditySeconds(30 * 60)
.authorizedGrantTypes("authorization_code", "implicit", "password", "client_credentials");
}
@Override
public void configure(AuthorizationServerEndpointsConfigurer endpoints) throws Exception {
endpoints.authenticationManager(authenticationManager)
.tokenStore(tokenStore());
}
@Bean
public TokenStore tokenStore() {
return new InMemoryTokenStore();
}
}
|
要让一个工程成为授权服务器,需要在该工程的配置类上加上 @EnableAuthorizationServer 注解。
到这里我们就构建了一个简单的授权服务器。
资源服务器
依赖配置
资源服务器的依赖文件 pom.xml 看起来和授权服务器的差不多
1
2
3
4
5
6
7
8
9
10
11
12
13
14
15
16
17
18
19
20
21
22
23
24
25
26
27
28
29
30
31
32
33
34
35
36
37
38
39
40
41
42
43
44
45
46
47
| <?xml version="1.0" encoding="UTF-8"?>
<project xmlns="http://maven.apache.org/POM/4.0.0"
xmlns:xsi="http://www.w3.org/2001/XMLSchema-instance"
xsi:schemaLocation="http://maven.apache.org/POM/4.0.0 http://maven.apache.org/xsd/maven-4.0.0.xsd">
<modelVersion>4.0.0</modelVersion>
<parent>
<groupId>com.example</groupId>
<artifactId>example-oauth2</artifactId>
<version>0.0.1-SNAPSHOT</version>
</parent>
<artifactId>example-user</artifactId>
<dependencies>
<dependency>
<groupId>org.springframework.boot</groupId>
<artifactId>spring-boot-starter-web</artifactId>
</dependency>
<dependency>
<groupId>org.springframework.security.oauth</groupId>
<artifactId>spring-security-oauth2</artifactId>
<version>2.5.2.RELEASE</version>
</dependency>
<dependency>
<groupId>org.projectlombok</groupId>
<artifactId>lombok</artifactId>
<optional>true</optional>
</dependency>
</dependencies>
<build>
<plugins>
<plugin>
<groupId>org.springframework.boot</groupId>
<artifactId>spring-boot-maven-plugin</artifactId>
<configuration>
<excludes>
<exclude>
<groupId>org.projectlombok</groupId>
<artifactId>lombok</artifactId>
</exclude>
</excludes>
</configuration>
</plugin>
</plugins>
</build>
</project>
|
端口配置
我们给资源服务器分配的端口为 8081,配置在 application.yml 文件中
资源和资源接口
首先我们来创建资源和相应的访问接口。我们的资源很简单,它只有 id 和 name 两个属性
1
2
3
4
5
6
7
8
| import lombok.Data;
@Data
public class User {
private Integer id;
private String name;
}
|
我们的资源接口也很简单,它只有一个访问详情的接口
1
2
3
4
5
6
7
8
9
10
11
12
13
14
15
16
17
18
19
| import com.example.user.entity.User;
import org.springframework.security.access.prepost.PreAuthorize;
import org.springframework.web.bind.annotation.GetMapping;
import org.springframework.web.bind.annotation.PathVariable;
import org.springframework.web.bind.annotation.RequestMapping;
import org.springframework.web.bind.annotation.RestController;
@RestController
@RequestMapping("/user")
public class UserController {
@GetMapping("/{id}")
@PreAuthorize("#oauth2.hasScope('user')")
public User detail(@PathVariable("id") Integer id) {
User user = new User();
user.setId(id);
user.setName("user-" + id);
return user;
}
}
|
注意到 @PreAuthorize("#oauth2.hasScope('user')") 这行代码中的 #oauth2.hasScope('user'),我们需要开启全局的方法安全才会生效,参考后面的方法安全配置类。
Web 安全配置
1
2
3
4
5
6
7
8
9
10
11
12
13
14
15
| import org.springframework.context.annotation.Configuration;
import org.springframework.security.config.annotation.web.builders.HttpSecurity;
import org.springframework.security.config.annotation.web.configuration.EnableWebSecurity;
import org.springframework.security.config.annotation.web.configuration.WebSecurityConfigurerAdapter;
@Configuration
@EnableWebSecurity
public class WebSecurityConfig extends WebSecurityConfigurerAdapter {
@Override
protected void configure(HttpSecurity http) throws Exception {
http.authorizeHttpRequests()
.antMatchers("/**").authenticated();
http.csrf().disable();
}
}
|
资源服务器配置
1
2
3
4
5
6
7
8
9
10
11
12
13
14
15
16
17
18
19
| import org.springframework.context.annotation.Configuration;
import org.springframework.security.oauth2.config.annotation.web.configuration.EnableResourceServer;
import org.springframework.security.oauth2.config.annotation.web.configuration.ResourceServerConfigurerAdapter;
import org.springframework.security.oauth2.config.annotation.web.configurers.ResourceServerSecurityConfigurer;
import org.springframework.security.oauth2.provider.token.RemoteTokenServices;
@Configuration
@EnableResourceServer
public class OAuth2ResourceServerConfig extends ResourceServerConfigurerAdapter {
@Override
public void configure(ResourceServerSecurityConfigurer resources) throws Exception {
RemoteTokenServices tokenServices = new RemoteTokenServices();
tokenServices.setCheckTokenEndpointUrl("http://localhost:9090/oauth/check_token");
tokenServices.setClientId("example-client");
tokenServices.setClientSecret("example-client-secret");
resources.tokenServices(tokenServices);
}
}
|
要使一个工程变成资源服务器需要在该工程的配置类上加上 @EnableResourceServer 注解。
方法安全配置
1
2
3
4
5
6
7
8
9
10
11
12
| import org.springframework.security.access.expression.method.MethodSecurityExpressionHandler;
import org.springframework.security.config.annotation.method.configuration.EnableGlobalMethodSecurity;
import org.springframework.security.config.annotation.method.configuration.GlobalMethodSecurityConfiguration;
import org.springframework.security.oauth2.provider.expression.OAuth2MethodSecurityExpressionHandler;
@EnableGlobalMethodSecurity(prePostEnabled = true)
public class MethodSecurityConfig extends GlobalMethodSecurityConfiguration {
@Override
protected MethodSecurityExpressionHandler createExpressionHandler() {
return new OAuth2MethodSecurityExpressionHandler();
}
}
|
这里需要使用 @EnableGlobalMethodSecurity 注解,并设置 prePostEnabled 属性的值为 true。MethodSecurityExpressionHandler 的实现需要换成 OAuth2MethodSecurityExpressionHandler,不然 #oauth2 无效。
验证测试
这里只测试授权码模式,即 authorization_code 模式。
申请授权码
在浏览器中访问 http://localhost:9090/oauth/authorize?client_id=example-client&cliect_secret=example-client-secret&response_type=code 申请授权码,其中的 client_id 和 cliect_secret 的值就是在授权服务器配置类中配置的客户端 ID 和客户端密码
1
2
3
| clients.inMemory()
.withClient("example-client")
.secret("{noop}example-client-secret")
|
此时会跳转到 http://localhost:9090/login 登录页面
在这里输入资源拥有者的用户名和密码,即 bob 和 123456

点击 Sign in 按钮会跳转到授权页面

当我们选择好对资源的授权后,点击 Authorize 按钮就会跳转到我们在授权服务器配置类中配置的跳转地址,即 .redirectUris("https://www.baidu.com"),只是此时会携带授权码 https://www.baidu.com/?code=Conxl4,Conxl4 就是授权码。

申请访问令牌
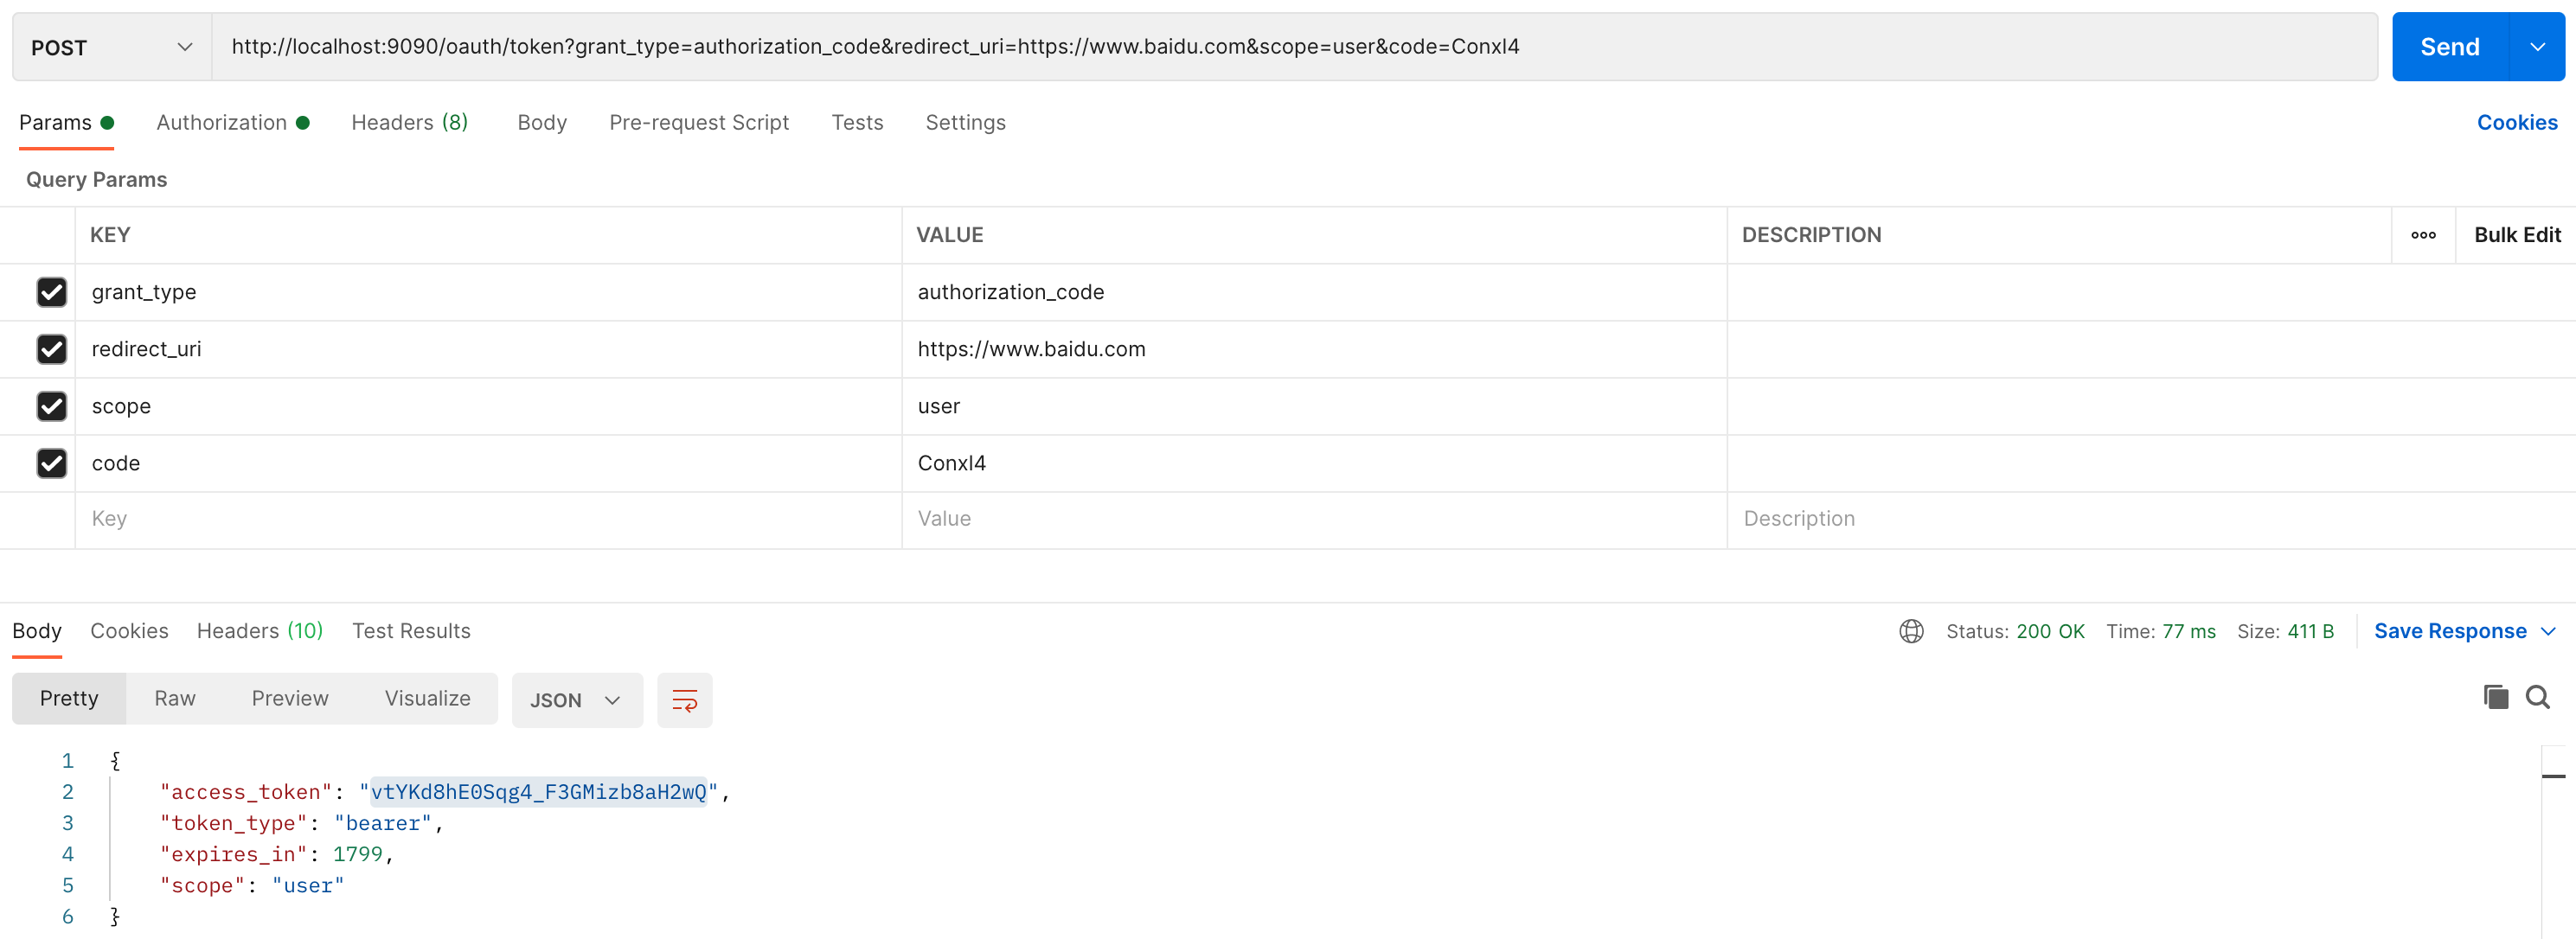
使用 Postman 访问 http://localhost:9090/oauth/token?grant_type=authorization_code&redirect_uri=https://www.baidu.com&scope=user&code=Conxl4 获取访问令牌

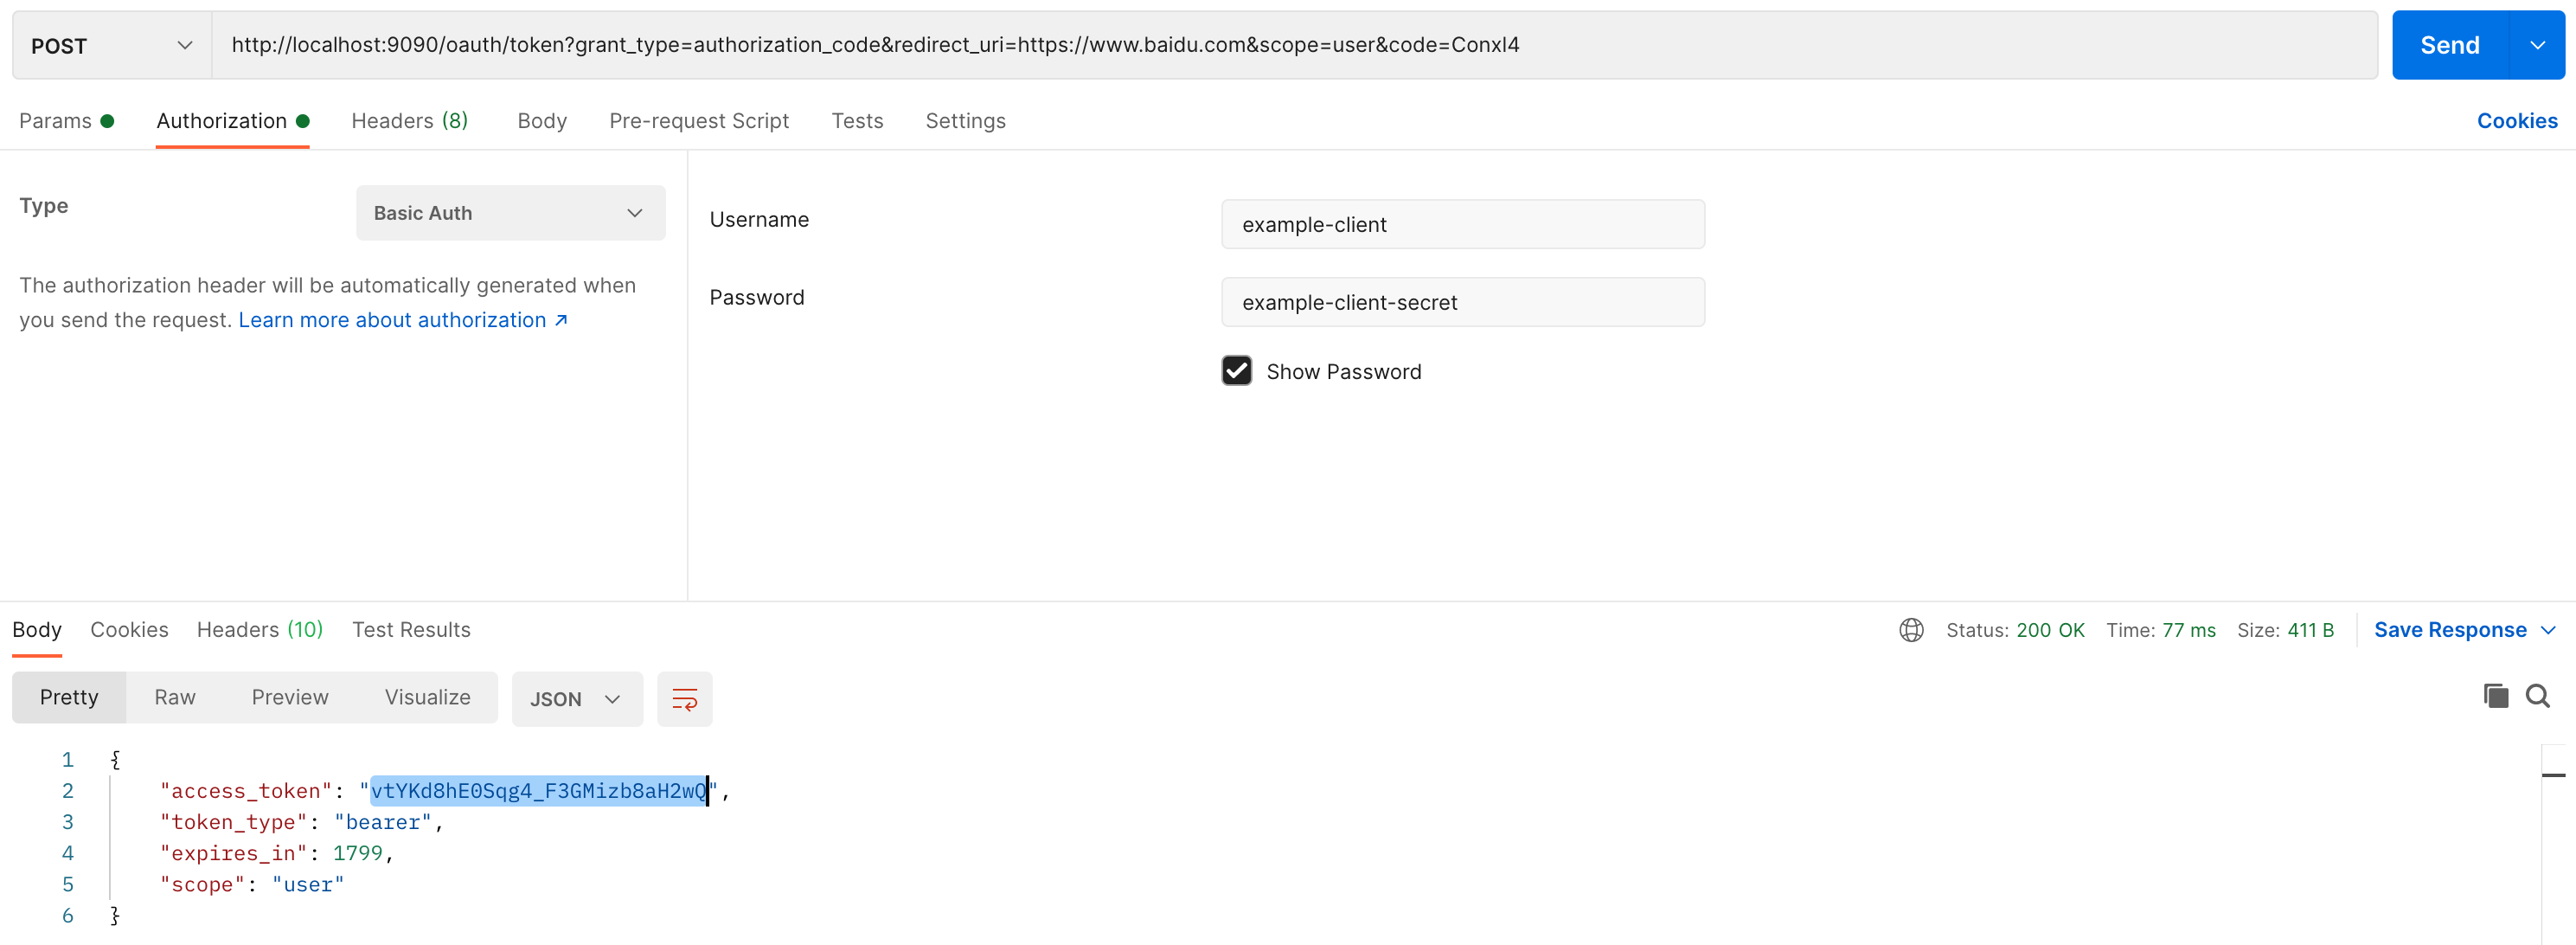
注意请求的方法为 POST,grant_type 的值为 authorization_code,redirect_uri 的值为在授权服务器配置类中配置的跳转地址 https://www.baidu.com,scope 的值为 user,code 的值为在前面获取的授权码 Conxl4。另外需要注意需要配置 Authorization 参数,具体的配置如下,Type 需要选择 Basic Auth,Username 和 Password 分别是在授权服务器配置类中配置的客户端 ID 和客户端密码

发送请求后我们会得到如下的返回结果
1
2
3
4
5
6
| {
"access_token": "vtYKd8hE0Sqg4_F3GMizb8aH2wQ",
"token_type": "bearer",
"expires_in": 1799,
"scope": "user"
}
|
其中的 access_token 就是我们的访问令牌。
校验令牌
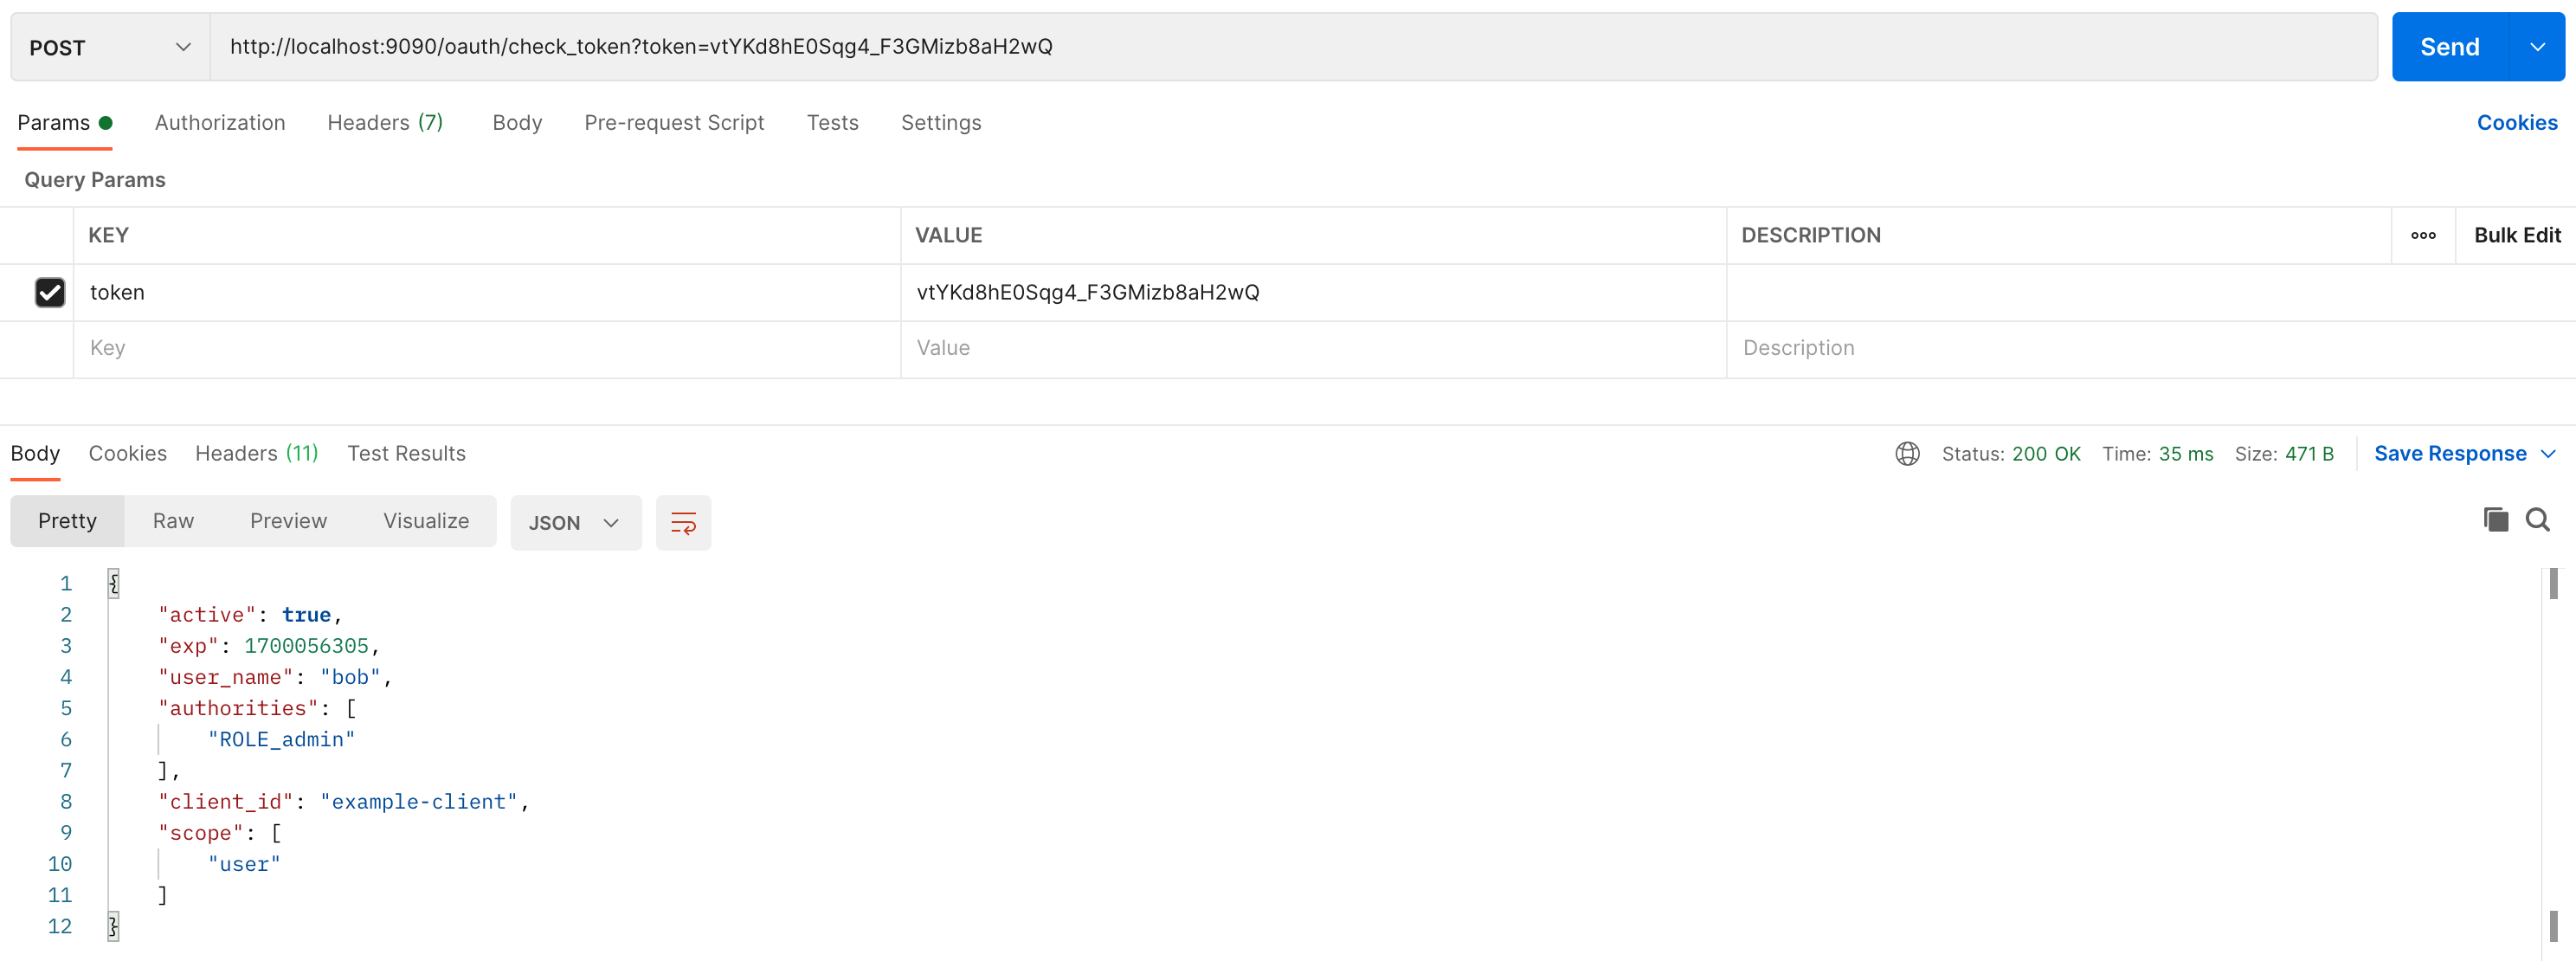
我们可以访问 http://localhost:9090/oauth/check_token?token=vtYKd8hE0Sqg4_F3GMizb8aH2wQ 校验访问令牌的有效性,其中 token 参数的值为前面获取的访问令牌,同时要注意请求的方法为 POST

发送请求后我们会得到如下的返回结果
1
2
3
4
5
6
7
8
9
10
11
12
| {
"active": true,
"exp": 1700056305,
"user_name": "bob",
"authorities": [
"ROLE_admin"
],
"client_id": "example-client",
"scope": [
"user"
]
}
|
访问受保护资源
下面我们就可以用访问令牌访问受保护的资源了,其中 access_token 为前面获取的访问令牌

我们可以在申请授权码时在授权页面只同意 scope.user 的授权,然后用这个授权码去申请访问令牌,最后用访问令牌去访问受保护资源,此时我们得到如下的响应结果
1
2
3
4
5
| {
"error": "insufficient_scope",
"error_description": "Insufficient scope for this resource",
"scope": "user"
}
|
这证明我们的 @PreAuthorize("#oauth2.hasScope('user')") 起作用了。当我们校验这个访问令牌时返回结果的 scope 部分如下
与 @PreAuthorize 注解中要求的不一致,因此返回了 insufficient_scope 的结果。
其他
我们可以引入 spring-security-oauth2-autoconfigure
1
2
3
4
5
| <dependency>
<groupId>org.springframework.security.oauth.boot</groupId>
<artifactId>spring-security-oauth2-autoconfigure</artifactId>
<version>2.6.8</version>
</dependency>
|
使用文档在 OAuth2 Boot。
参考资料
- Spring Security实现OAuth2协议及实战
- Spring REST API + OAuth2 + Angular (using the Spring Security OAuth legacy stack)
- 狂盗一枝梅 / spring-security-oauth-study
- Spring Security Oauth2之scope作用域机制使用详解
- 如何基于Scope使用@PreAuthorize保护spring-security-oauth资源?
- How to protect spring-security-oauth resources using @PreAuthorize based on Scope?
- Using scopes as roles in Spring Security OAuth2 (provider)


